0%

假期时候花了点时间将博客迁移到了 Hexo,下面记录一些部署流程。

安装

安装 node:

1
$ brew install node

安装 Hexo:

1
$ npm install hexo-cli -g

新建博客项目:

1
2
3
$ hexo init <folder>
$ cd <folder>
$ npm install

之后这个文件夹可以通过 Git 进行管理并托管 GitHub。

配置

配置文件

配置 _config.yml 文件:

1
2
3
4
5
6
url: https://qiweipeng.github.io

deploy:
type: git
repository: git@github.com:qiweipeng/qiweipeng.github.io.git
branch: master

要保证 GitHub 已经配置了 SSH,之后命令行进行部署就很方便。

安装主题

安装 next 主题:

1
2
$ cd <folder>
$ git clone https://github.com/theme-next/hexo-theme-next themes/next

之后修改 _config.yml 文件更换主题

1
theme: next

CNAME

markdown 文件放在 source/_posts 文件夹下,如果绑定域名,CNAME 文件放在 source 文件夹下。

发布流程

1
2
3
4
5
6
7
$ hexo new "My New Post" // 创建新的 markdown 文件

$ hexo server // 本地部署

$ hexo g // 生成

$ hexo d // 部署

图床

因为域名备案的原因,不想再用七牛云的图床了,打算直接在 GitHub 上建一个仓库作为图床。

创建 qiweipeng/images 仓库。设置中打开 GitHub PagesCustom domain 设置为 image.qiweipeng.com,打开 HTTPS。同时 GoDaddy 设置 CNAME,值 image 指向 qiweipeng.github.io

之后安装 PicGo 进行图片的上传。打开[上传前重命名]和[时间戳重命名]。设置 GitHub 图床:

图 - 4: PicGo 中 GitHub 图床设置

其中需要配置 Personal access tokens,命名如 Weipeng's MacBook Pro - PicGo,打开的权限:

  • repo

本文记录自己新装电脑后的软件安装和个性化配置,以及之后的维护。

软件安装

App Store

  • 1Password
  • Spark
  • Fantastical
  • Todoist
  • Notability
  • MindNode
  • Drafts
  • Reeder
  • Xcode
  • Sequel Ace
  • Wechat
  • QQ
  • Pages
  • Keynote
  • Numbers
  • WPS Office
  • Apple Developer
  • Swift Playgrounds
  • CloudMounter
  • The Unarchiver
  • Magnet
  • Bear
  • Amphetamine
  • Petrify
  • Cleaner for Xcode
  • quicktype

Homebrew

安装 Homebrew

1
/bin/bash -c "$(curl -fsSL https://raw.githubusercontent.com/Homebrew/install/HEAD/install.sh)"

使用 Homebrew 安装软件:

1
$ brew install <name>
  • mysql
  • git
  • sqlite
  • nvm(如果安装多版本 node)
  • node(如果只安装单版本 node)

使用 brew cask 安装应用:

1
$ brew install --cask <name>
  • android-studio
  • google-chrome
  • oracle-jdk
  • openjdk
  • openjdk@8
  • appcleaner
  • iina
  • pdf-expert
  • baidunetdisk
  • imazing
  • picgo
  • db-browser-for-sqlite
  • iterm2
  • postman
  • downie
  • moneywiz
  • fliqlo
  • mweb
  • visual-studio-code
  • github
  • notion
  • dash
  • sketch
  • figma
  • feishu

手动安装

  • SF Symbols
  • ClashX
  • trojan-qt5

配置和维护

需要激活的 App

  • MoneyWiz
  • MWeb
  • Sketch
  • PDF Expert
  • Downie

系统配置

System Preferences

  • General -> SideBar icon size: Small
  • General -> Recent items: 5
  • Desktop & Screen Saver -> Screen Saver: Fliqlo
  • Desktop & Screen Saver -> Start after: 5 Minutes
  • Dock -> Position on screen: Left
  • Dock -> Show recent application in Dock: NO
  • Notifications: 对所有 App 进行配置
  • Accessibility -> Pointer Control -> Trackpad Options -> Enable dragging: three finger drag
  • Security & Privacy -> General -> Requeire passowrd: 5seconds
  • Security & Privacy -> FileVault: Turn On
  • Security & Privacy -> Firewall: Turn On
  • Keyboard -> Text -> Correct spelling automatically: NO
  • Keyboard -> Input Sources: 增加小鹤双拼
  • Trackpad: 打开所有手势
  • Displays -> NightShift: Turn On

Finder

  • General -> New Finder windows show: qiweipeng
  • Tags: 添加到 Favorite Tags
  • SideBar -> Favorites: 仅保留 Applications、Downloads、qiweipeng

Safari

  • 首页 -> Show Frequently Visited: Turn Off
  • General -> Open "safe" files after downloading: No
  • Search -> Search engine: Google
  • Advanced -> Show Develop menu in menu bar: Yes
  • Extensions: 各个插件具体配置

其它

  • FaceTime -> Ringtone: Hillside
  • Message -> Message received sound: Bamboo
  • 所有的系统 App 打开 iCloud 账户同步功能

Homebrew

常用命令:

1
2
3
4
5
6
7
8
9
10
11
12
13
14
15
16
17
18
19
20
21
22
23
24
25
26
27
$ brew list // 安装的软件列表

$ brew install <name> // 安装某个包

$ brew uninstall <name> // 卸载安装的软件

$ brew update // 更新 Homebrew 本身

$ brew outdated 查看过期软件

$ brew upgrade <formula> // 更新指定软件

$ brew pin <formula> 指定某软件保持在当前版本不被更新

$ brew unpin <formula> 取消某软件保持在当前版本

$ brew --cache 查看 Homebrew 缓存目录

// cask 相关

$ brew install --cask <name> // 使用 cask 安装软件

$ brew list --cask // 使用 cask 命令安装的应用列表

$ brew cask uninstall <name> // 卸载使用 cask 命令安装的应用

$ brew cask search <name> // 查找

避免 Homebrew 自动更新:在 ~/.zshrc 文件中写入 export HOMEBREW_NO_AUTO_UPDATE=true

安装 homebrew-cask-upgrade 方便 cask 应用更新:

1
2
3
4
5
$ brew tap buo/cask-upgrade // 安装

$ brew cu -a // 更新所有

$ brew cu <name> -a 更新指定

node

常用命令:

1
2
3
$ npm list // 查看当前目录安装的包

$ npm list -g --depth 0 // 查看本地全局安装过的包

如果需要多版本的 node 则可以通过 brew install nvm 安装 nvm,之后通过 nvm 安装和管理各版本的 node

nvm

安装流程:

1
brew install nvm

.zshrc 中写入:

1
2
export NVM_DIR="$HOME/.nvm"
[ -s "/usr/local/opt/nvm/nvm.sh" ] && . "/usr/local/opt/nvm/nvm.sh" # This loads nvm

安装指定版本:

1
2
// 安装 12.16.3
nvm install v12.16.3

查看:

1
nvm list

如果安装了多个版本,使用如 nvm use v12.16.3 切换到指定版本(重启终端将恢复默认版本),使用如 nvm alias default v12.16.3 设置默认版本。

CocoaPods

安装 CocoaPods

1
$ sudo gem install cocoapods

CocoaPods 版本更新:首先使用 $ sudo gem install cocoapods 安装最新版本,之后看哪些被更新了($ gem list),再将旧版本卸载掉,比如 $ sudo gem uninstall cocoapods-core -v 1.9.1

常用命令:

1
2
3
4
5
pod repo // 查看本地关联了哪些仓库源

pod repo update // 本地仓库更新

pod repo update <name> // 更新指定的仓库

Git

参考个人文章《macOS 下 Git 多账号配置,同时管理多个 SSH Key》配置 SSH Key,主要用在 GitHub。

参考个人文章《如何设置 Git 全局忽略 .DS_Store 文件》配置全局忽略文件。

参考个人文章《记录一些 Git 的命令》对 Git 进行配置,如:

1
2
3
4
5
6
7
8
9
10
11
12
13
14
15
// 设置全局的用户名和邮箱
$ git config --global user.name "<name>"
$ git config --global user.email "<email address>"

// 让 Git 输出语句显示颜色
$ git config --global color.ui true

// 给常用 Git 命令设置别名,以快捷输入,这个依然是保存在家目录的 .gitconfig 文件中
$ git config --global alias.st status
$ git config --global alias.co checkout
$ git config --global alias.ci commit
$ git config --global alias.br branch
$ git config --global alias.unstage 'reset HEAD'
$ git config --global alias.last 'log -1'
$ git config --global alias.lg "log --color --graph --pretty=format:'%Cred%h%Creset -%C(yellow)%d%Creset %s %Cgreen(%cr) %C(bold blue)<%an>%Creset' --abbrev-commit"

Java

使用 brew 安装 openjdk 后,需要关注(使用 brew info openjdk 查看):

1
2
3
4
5
6
7
8
9
10
11
12
For the system Java wrappers to find this JDK, symlink it with
sudo ln -sfn /usr/local/opt/openjdk/libexec/openjdk.jdk /Library/Java/JavaVirtualMachines/openjdk.jdk

openjdk is keg-only, which means it was not symlinked into /usr/local,
because macOS provides similar software and installing this software in
parallel can cause all kinds of trouble.

If you need to have openjdk first in your PATH, run:
echo 'export PATH="/usr/local/opt/openjdk/bin:$PATH"' >> ~/.zshrc

For compilers to find openjdk you may need to set:
export CPPFLAGS="-I/usr/local/opt/openjdk/include"

同样,安装 openjdk@8 后,需要关注(使用 brew info openjdk@8 查看):

1
2
3
4
5
6
7
8
9
10
11
For the system Java wrappers to find this JDK, symlink it with
sudo ln -sfn /usr/local/opt/openjdk@8/libexec/openjdk.jdk /Library/Java/JavaVirtualMachines/openjdk-8.jdk

openjdk@8 is keg-only, which means it was not symlinked into /usr/local,
because this is an alternate version of another formula.

If you need to have openjdk@8 first in your PATH, run:
echo 'export PATH="/usr/local/opt/openjdk@8/bin:$PATH"' >> ~/.zshrc

For compilers to find openjdk@8 you may need to set:
export CPPFLAGS="-I/usr/local/opt/openjdk@8/include"

(这是直接安装 Oracle JDK 时的配置,OpenJDK 也可以做类似配置,或直接在需要时更改 .zshrc 文件中两个版本的声明顺序)如果安装了多个版本的 Java,可在 .zshrc 中写入:

1
2
3
4
5
6
7
8
9
10
# JDK 8
export JAVA_8_HOME="/Library/Java/JavaVirtualMachines/jdk1.8.0_271.jdk/Contents/Home"
# JDK 15
export JAVA_15_HOME="/Library/Java/JavaVirtualMachines/jdk-15.0.1.jdk/Contents/Home"
# 默认JDK 8
export JAVA_HOME=$JAVA_8_HOME

# alias命令动态切换JDK版本
alias jdk8="export JAVA_HOME=$JAVA_8_HOME"
alias jdk15="export JAVA_HOME=$JAVA_15_HOME"

之后可以使用 jdk8jdk15 切换 java 版本。

Xcode

配置 GitHub

登录 GitHub:需要配置 Personal access tokens,命名如 Weipeng's MacBook Pro - Xcode,打开的权限:

  • repo
  • admin:org
  • admin:public_key
  • user

代码块

将备份的代码块,即 CodeSnippets 文件夹拖入 ~/Library/Developer/Xcode/UserData 目录内。

偏好设置

Preferences 选中 Behaviors,根据 图 - 1图 - 2 进行设置。

图 - 1: Xcode 偏好设置1

图 - 2: Xcode 偏好设置2

命令行快捷键

创建文件 open_terminal.sh,写入代码:

1
2
3
4
5
6
#!/bin/sh
if [ -n "$XcodeProjectPath" ]; then
open -a iTerm "$XcodeProjectPath"/..
else
open -a iTerm "$XcodeWorkspacePath"/..
fi

之后将脚本保存 ~/Local/Scripts/ 目录下,然后在该目录下执行 chmod +x open_terminal.sh 将脚步设为可执行。

打开 Xcode 的 Preferences,选中 Behaviors,新建并命名为 Open Terminal,快捷键设置为 Control + Command + /,路径选择脚本所在路径。

图 - 3: 打开命令行脚本设置

Visual Studio Code

Shift + Command + P 之后找到 Shell Command: Install "code" command in PATH,运行。

登录同步账号:qiweipeng@hotmail.com,登录 Github。

PicGo

打开[上传前重命名]和[时间戳重命名]。

GitHub 图床设置:

图 - 4: PicGo 中 GitHub 图床设置

其中需要配置 Personal access tokens,命名如 Weipeng's MacBook Pro - PicGo,打开的权限:

  • repo

Trojan

User Rules 配置:

1
2
3
4
5
6
7
8
||notion.so
||*.notion.so
||github.com
||*.github.com
||githubusercontent.com
||*.githubusercontent.com
||dribbble.com
||*.dribbble.com

本文记录一下自己在写 ObjC 代码时遵守的规范,只记录大概,以供查询。

书写顺序

1
2
3
4
5
6
7
8
9
10
11
12
13
.h
版权
头文件引入(系统/第三方/项目)
NS_ASSUME_NONNULL_BEGIN
@class
宏定义
常量定义
Block 类型定义
枚举
函数声明
协议定义
类定义 @interface
NS_ASSUME_NONNULL_END
1
2
3
4
5
6
7
8
9
10
.m
版权
头文件引入(系统/第三方/项目)
宏定义
常量定义
Block 类型定义
枚举
函数
@interface
@implementation

属性关键字顺序:

1
(nullable, nonatomic, readwrite, getter=method, strong)

规范写法

常量

下面是钟颖的代码中定义的静态常量

1
2
3
static const CGFloat kTabBarHeight      = 44.0;
static const CGFloat kStatusBarHeight = 20.0;
static const CGFloat kTableContentInset = 200;
1
2
3
4
5
6
7
8
9
10
11
12
// .h
// 字符串常量声明
extern NSString * const <stringName>;

// .m
// 静态字符串常量
static NSString * const <stringName> = @"<stringName>";
// 静态常量
static const <Type> <constantName> = <value>;

// 字符串常量
NSString * const <stringName> = @"<stringName>";

通知

下面是 AFNetworking 中通知的写法。

1
2
3
4
// .h
FOUNDATION_EXPORT NSString * const AFNetworkingTaskDidCompleteNotification;
// .m
NSString * const AFNetworkingTaskDidCompleteNotification = @"com.alamofire.networking.task.complete";

前缀

前缀需要使用三个字母,如 QWP

类名

类名需要添加类前缀。

分类方法

特别是给系统框架的类增加 Category 的时候,定义的方法需要加小写的类前缀,如 - (NSURL *)sd_currentImageURL;,原因是如果分类方法不小心和类中原有方法或者和其他分类方法同名了,有可能就会覆盖。同一个类的不同分类也可以通过前缀避免方法重名。

Protocol 的名字

制定代理协议的时候,协议名需要加上制定者的类前缀;但是协议方法是不需要加类前缀的。

References

  1. Coding Guidelines for Cocoa
  2. GitHub Objective-C Style Guide
  3. Google Objective-C Style Guide
  4. NYTimes Objective-C Style Guide
  5. The official raywenderlich.com Objective-C style guide

可以使用 Github 创建一个私有的 Specs 库,如 https://github.com/qiweipeng/Specs.git,其 ssh 地址是 git@github.com:qiweipeng/Specs.git

命令行 pod repo add qiweipeng git@github.com:qiweipeng/Specs.git 将这个源拉到本地,本地名称就是命名的 qiweipeng

使用 pod repo 可以查看本地关联的仓库可以确定否添加成功。

指定一个文件夹,在其中 pod lib create Hello 创建一个命为 Hello 的 Pod 项目,之后一系列选项,配置好即可。

1
2
3
4
5
6
7
8
9
10
11
12
13
14
15
16
17
18
19
20
21
22
23
24
25
26
27
28
29
30
31
32
33
34
35
36
37
38
39
40
41
42
43
44
45
46
47
48
49
50
51
52
53
54
55
qiweipeng@Weipengs-MacBook-Air Developer % pod lib create Hello
Cloning `https://github.com/CocoaPods/pod-template.git` into `Hello`.
Configuring Hello template.
security: SecKeychainSearchCopyNext: The specified item could not be found in the keychain.

------------------------------

To get you started we need to ask a few questions, this should only take a minute.

If this is your first time we recommend running through with the guide:
- https://guides.cocoapods.org/making/using-pod-lib-create.html
( hold cmd and click links to open in a browser. )


What platform do you want to use?? [ iOS / macOS ]
>
ios
What language do you want to use?? [ Swift / ObjC ]
> ObjC

Would you like to include a demo application with your library? [ Yes / No ]
>
yes
Which testing frameworks will you use? [ Specta / Kiwi / None ]
> None

Would you like to do view based testing? [ Yes / No ]
> No

What is your class prefix?
> QWP
security: SecKeychainSearchCopyNext: The specified item could not be found in the keychain.

Running pod install on your new library.

Analyzing dependencies
Downloading dependencies
Installing Hello (0.1.0)
Generating Pods project
Integrating client project

[!] Please close any current Xcode sessions and use `Hello.xcworkspace` for this project from now on.
Pod installation complete! There is 1 dependency from the Podfile and 1 total pod installed.

Ace! you're ready to go!
We will start you off by opening your project in Xcode
open 'Hello/Example/Hello.xcworkspace'

To learn more about the template see `https://github.com/CocoaPods/pod-template.git`.
To learn more about creating a new pod, see `https://guides.cocoapods.org/making/making-a-cocoapod`.

创建好的项目是一个 Git 仓库,里面的 Hello/Classes 文件夹用于放置代码,Hello/Assets 文件夹用于放置图片等素材(这些路径可以通过修改 Hello.podspec 文件进行修改)。外部的 Hello.podspec 是配置文件,另外还有 LICENSE 和 README 等都已经自动创建好。

1
2
3
4
5
6
7
8
9
10
11
12
13
14
15
16
17
18
19
20
21
22
23
24
25
26
27
28
29
30
31
32
33
34
35
36
37
38
39
40
41
42
#
# Be sure to run `pod lib lint Hello.podspec' to ensure this is a
# valid spec before submitting.
#
# Any lines starting with a # are optional, but their use is encouraged
# To learn more about a Podspec see https://guides.cocoapods.org/syntax/podspec.html
#

Pod::Spec.new do |s|
s.name = 'Hello'
s.version = '0.1.0'
s.summary = 'A short description of Hello.'

# This description is used to generate tags and improve search results.
# * Think: What does it do? Why did you write it? What is the focus?
# * Try to keep it short, snappy and to the point.
# * Write the description between the DESC delimiters below.
# * Finally, don't worry about the indent, CocoaPods strips it!

s.description = <<-DESC
TODO: Add long description of the pod here.
DESC

s.homepage = 'https://github.com/Weipeng Qi/Hello'
# s.screenshots = 'www.example.com/screenshots_1', 'www.example.com/screenshots_2'
s.license = { :type => 'MIT', :file => 'LICENSE' }
s.author = { 'Weipeng Qi' => 'qiweipeng@hotmail.com' }
s.source = { :git => 'https://github.com/Weipeng Qi/Hello.git', :tag => s.version.to_s }
# s.social_media_url = 'https://twitter.com/<TWITTER_USERNAME>'

s.ios.deployment_target = '8.0'

s.source_files = 'Hello/Classes/**/*'

# s.resource_bundles = {
# 'Hello' => ['Hello/Assets/*.png']
# }

# s.public_header_files = 'Pod/Classes/**/*.h'
# s.frameworks = 'UIKit', 'MapKit'
# s.dependency 'AFNetworking', '~> 2.3'
end

Hello.podspec 文件的具体配置可以参考官网

具体的可以设置第三方依赖,可以设置系统 Framework 依赖,可以设置 Info.plist 文件,可以指定具体的图片资源、静态库文件,可以指定具体的平台和版本,也可以配置 compiler_flags 等。

如果是私有库,s.source 可以指定为 git@github.com:qiweipeng/Hello.git 这样的通过 ssh 访问的地址。

代码写好,配置好后,将这个 Git 项目上传到 Gtihub 进行托管,地址和 Hello.podspec 中的应一致。

之后需要验证 Hello.podspec 文件,使用 pod spec lint Hello.podspec 进行联网验证,或使用 pod lib lint Hello.podspec 进行本地验证,建议使用联网验证。

因为创建的 Specs 库在 Github 上是私有的,使用了 SSH;对于 Hello 库,因为也是私有的,在验证时会出现警告说无法访问 https://github.com/qiweipeng/Hello,于是验证和提交都加上 --allow-warnings

这里可选参数有:

  • --allow-warnings: 允许警告;
  • --sources=‘master,privateSpecs: 指定源,比如你的私有pod同时依赖了公有库和私有库,你必须指定源才行,因为默认只会去在公有源中查找对应的依赖;
  • --use-libraries: 如果使用了静态库,记得加上它;

确定验证通过,然后将 Hello.podspec 文件提交到之前创建的私有 Specs 库中,命令为 pod repo push qiweipeng Hello.podspec,如果 Hello 是私有库,为了通过,则命令为 pod repo push qiweipeng Hello.podspec --allow-warnings

成功后就可以正常使用了,不过我们需要在 Podfile 文件中指定源:

1
2
3
4
5
6
7
8
9
source 'git@github.com:qiweipeng/Specs.git'
platform :ios, '9.0'

target 'Demo' do
use_frameworks!

pod 'Hello', '~> 0.1.0'

end

实际工作中也可以直接将已有项目转成 Pods,只需要加一个配置文件即可:

1
2
3
$ pod spec create Peanut
$ edit Peanut.podspec
$ pod spec lint Peanut.podspec

另外,我们创建的 Pod 也可以不通过任何 Specs 管理而直接使用,我们在其它项目中直接在 Podfile 文件中通过相对路径找到需要的 Pod.podspec 文件即可。如:

1
2
3
4
5
6
7
8
platform :ios, '9.0'

target 'Demo' do
use_frameworks!

pod 'Hello', :path => '../Hello/'

end

Block 介绍,截获变量如何实现,__block 修饰符,Block 内存管理,Block 循环引用。
clang -rewrite-objc -fobjc-arc main.m

介绍

BlockObjective-C 对闭包的实现,Block 是将函数及其上下文封装起来的对象。

Block 的底层实现

main.m 文件中写入如下代码:

1
2
3
4
5
6
7
8
9
10
11
12
13
#import <Foundation/Foundation.h>

int main(int argc, const char * argv[]) {
@autoreleasepool {

void (^simpleBlock)(void) = ^{
NSLog(@"This is a block.");
};

simpleBlock();
}
return 0;
}

命令行输入 clang -rewrite-objc main.m 将其转为 C++ 文件 main.cpp。两段关于 Block 的代码编译后如下:

1
2
3
void (*simpleBlock)(void) = ((void (*)())&__main_block_impl_0((void *)__main_block_func_0, &__main_block_desc_0_DATA));

((void (*)(__block_impl *))((__block_impl *)simpleBlock)->FuncPtr)((__block_impl *)simpleBlock); // 可以看到 Block 的调用最终其实就是去找它的实现 `__block_impl` 中的函数指针 `FuncPtr`,最终就是一个函数调用

这里面涉及几个结构:

1
2
3
4
5
6
7
8
9
10
11
12
13
14
15
16
17
18
19
20
21
22
23
24
25
26
27
28
29
30
31
32
33

// 代表 Block 对象
struct __main_block_impl_0 {
struct __block_impl impl; // 实现
struct __main_block_desc_0* Desc; // 内存管理
__main_block_impl_0(void *fp, struct __main_block_desc_0 *desc, int flags=0) {
impl.isa = &_NSConcreteStackBlock; // 代表这是一个栈区 Block
impl.Flags = flags;
impl.FuncPtr = fp; // 将 __main_block_func_0 作为 Block 具体的实现函数
Desc = desc;
} // 构造函数
};

// Block 的实现
struct __block_impl {
void *isa; // 表明 Block 是一个对象
int Flags;
int Reserved;
void *FuncPtr; // 函数指针,指向具体实现
};

// Block 的实现函数
static void __main_block_func_0(struct __main_block_impl_0 *__cself) {

NSLog((NSString *)&__NSConstantStringImpl__var_folders_q4_jm3g73557p74v3ncp13gq3l00000gn_T_main_455ba4_mi_0);
}

// 包含 Block 的内存管理
static struct __main_block_desc_0 {
size_t reserved;
size_t Block_size;
} __main_block_desc_0_DATA = { 0, sizeof(struct __main_block_impl_0)};

图 1 - Block 的底层结构

结论:

  • Block 是一个对象,因为有 isa 指针;
  • 上述 Block 是一个栈区 Block
  • Block 的执行本质就是在执行一个函数;

Block 值类型临时变量的捕获

上述代码修改为:

1
2
3
4
5
6
7
8
9
10
11
12
13
14
15
16
17
#import <Foundation/Foundation.h>

int main(int argc, const char * argv[]) {
@autoreleasepool {

int anInteger = 5; // 增加一个临时变量

void (^simpleBlock)(void) = ^{
NSLog(@"Integer is %d", anInteger); // Block 中使用这个临时变量。
};

anInteger = 10; // 修改临时变量

simpleBlock(); // 执行后打印结果为 5
}
return 0;
}

同样编译为 C++ 后,代码如下:

1
2
3
4
5
6
7
int anInteger = 5;

void (*simpleBlock)(void) = ((void (*)())&__main_block_impl_0((void *)__main_block_func_0, &__main_block_desc_0_DATA, anInteger)); // 增加了 anInteger 作为参数

anInteger = 10;

((void (*)(__block_impl *))((__block_impl *)simpleBlock)->FuncPtr)((__block_impl *)simpleBlock);

主要的变化是,__main_block_impl_0 的构造函数增加了 anInteger 作为参数传入。

1
2
3
4
5
6
7
8
9
10
11
12
13
14
15
16
17
struct __main_block_impl_0 {
struct __block_impl impl;
struct __main_block_desc_0* Desc;
int anInteger; // 增加了捕获的变量作为成员变量
__main_block_impl_0(void *fp, struct __main_block_desc_0 *desc, int _anInteger, int flags=0) : anInteger(_anInteger) {
impl.isa = &_NSConcreteStackBlock;
impl.Flags = flags;
impl.FuncPtr = fp;
Desc = desc;
}
};
static void __main_block_func_0(struct __main_block_impl_0 *__cself) {
// 增加了一句从 __main_block_impl_0 中获取捕获的变量的步骤,最终函数执行使用的也是捕获后的变量,而不是之前的临时变量
int anInteger = __cself->anInteger; // bound by copy

NSLog((NSString *)&__NSConstantStringImpl__var_folders_q4_jm3g73557p74v3ncp13gq3l00000gn_T_main_62f6c8_mi_0, anInteger);
}

结论:

  • Block 会捕获临时变量,即复制一份放入 Block 对象的结构体中,最终 Block 执行是使用的是复制过去的变量,因此被捕获的临时变量即使发生改变,不影响 Block 中捕获的值;
  • 对于值类型的临时变量,Block 是直接捕获的,即直接复制一份进去;

Block 关于更多类型变量的截获

上一部分是关于基本类型的临时变量的截获,就是直接复制一份,那么对于更多类型的变量呢?

  • 对于局部变量
    • 基本数据类型:直接截获该值,就是复制一份;
    • 对象类型:连同对象的所有权修饰符一起截获;
  • 静态局部变量:指针引用;
  • 静态全局变量:不捕获;
  • 全局变量:不捕获;

全局变量在整个工程中均有效;静态全局变量即 ObjC 中常常在 @implementation 上面定义的静态变量,它只在定义它的文件内有效;静态局部变量是在某个函数中定义的静态变量,程序只会为它分配一次内存,在函数返回后它不会消失,它的储存和静态全局变量类似,都不会放在栈区,而是在静态区;局部变量存储在栈区,随着函数执行结束内存就会释放。

1
2
3
4
5
6
7
8
9
10
11
12
13
14
15
16
17
18
19
20
21
22
23
24
25
26
27
#import <Foundation/Foundation.h>

int num1 = 10;
static int num2 = 20;

int main(int argc, const char * argv[]) {
@autoreleasepool {

static int num3 = 30;
int num4 = 40;

__unsafe_unretained id obj1 = nil;
__strong id obj2 = nil;

void (^simpleBlock)(void) = ^{
NSLog(@"全局变量%d", num1);
NSLog(@"静态全局变量%d", num2);
NSLog(@"静态局部变量 %d", num3);
NSLog(@"局部变量 %d", num4);
NSLog(@"对象1 %@", obj1);
NSLog(@"对象2 %@", obj2);
};

simpleBlock();
}
return 0;
}

使用命令 clang -rewrite-objc -fobjc-arc main.m 编译成 C++ 代码。

1
2
3
4
5
6
7
8
9
10
11
12
13
14
15
16
17
18
19
20
21
22
23
24
25
26
27
28
29
30
31
32
33
34
35
36
37
38
39
40
41
42
43
44
45
46
47
48
49
50
51
52
53
54
55
56
57
// 全局变量和静态全局变量都是在函数外定义,Block 不进行捕获而是直接可以拿到
int num1 = 10;
static int num2 = 20;


struct __main_block_impl_0 {
struct __block_impl impl;
struct __main_block_desc_0* Desc;
int *num3; // 局部静态变量通过指针方式捕获
int num4; // 局部变量直接捕获其值
__unsafe_unretained id obj1; // 对于对象,会包含其所有权修饰符一起捕获
__strong id obj2;
__main_block_impl_0(void *fp, struct __main_block_desc_0 *desc, int *_num3, int _num4, __unsafe_unretained id _obj1, __strong id _obj2, int flags=0) : num3(_num3), num4(_num4), obj1(_obj1), obj2(_obj2) {
impl.isa = &_NSConcreteStackBlock;
impl.Flags = flags;
impl.FuncPtr = fp;
Desc = desc;
}
};
static void __main_block_func_0(struct __main_block_impl_0 *__cself) {
int *num3 = __cself->num3; // bound by copy
int num4 = __cself->num4; // bound by copy
__unsafe_unretained id obj1 = __cself->obj1; // bound by copy
__strong id obj2 = __cself->obj2; // bound by copy

NSLog((NSString *)&__NSConstantStringImpl__var_folders_q4_jm3g73557p74v3ncp13gq3l00000gn_T_main_3341c1_mi_0, num1);
NSLog((NSString *)&__NSConstantStringImpl__var_folders_q4_jm3g73557p74v3ncp13gq3l00000gn_T_main_3341c1_mi_1, num2);
NSLog((NSString *)&__NSConstantStringImpl__var_folders_q4_jm3g73557p74v3ncp13gq3l00000gn_T_main_3341c1_mi_2, (*num3));
NSLog((NSString *)&__NSConstantStringImpl__var_folders_q4_jm3g73557p74v3ncp13gq3l00000gn_T_main_3341c1_mi_3, num4);
NSLog((NSString *)&__NSConstantStringImpl__var_folders_q4_jm3g73557p74v3ncp13gq3l00000gn_T_main_3341c1_mi_4, obj1);
NSLog((NSString *)&__NSConstantStringImpl__var_folders_q4_jm3g73557p74v3ncp13gq3l00000gn_T_main_3341c1_mi_5, obj2);
}
static void __main_block_copy_0(struct __main_block_impl_0*dst, struct __main_block_impl_0*src) {_Block_object_assign((void*)&dst->obj1, (void*)src->obj1, 3/*BLOCK_FIELD_IS_OBJECT*/);_Block_object_assign((void*)&dst->obj2, (void*)src->obj2, 3/*BLOCK_FIELD_IS_OBJECT*/);}

static void __main_block_dispose_0(struct __main_block_impl_0*src) {_Block_object_dispose((void*)src->obj1, 3/*BLOCK_FIELD_IS_OBJECT*/);_Block_object_dispose((void*)src->obj2, 3/*BLOCK_FIELD_IS_OBJECT*/);}

static struct __main_block_desc_0 {
size_t reserved;
size_t Block_size;
void (*copy)(struct __main_block_impl_0*, struct __main_block_impl_0*);
void (*dispose)(struct __main_block_impl_0*);
} __main_block_desc_0_DATA = { 0, sizeof(struct __main_block_impl_0), __main_block_copy_0, __main_block_dispose_0};
int main(int argc, const char * argv[]) {
/* @autoreleasepool */ { __AtAutoreleasePool __autoreleasepool;

static int num3 = 30;
int num4 = 40;

__attribute__((objc_ownership(none))) id obj1 = __null;
__attribute__((objc_ownership(strong))) id obj2 = __null;

void (*simpleBlock)(void) = ((void (*)())&__main_block_impl_0((void *)__main_block_func_0, &__main_block_desc_0_DATA, &num3, num4, obj1, obj2, 570425344));

((void (*)(__block_impl *))((__block_impl *)simpleBlock)->FuncPtr)((__block_impl *)simpleBlock);
}
return 0;
}

__block 修饰符

默认情况下,被捕获的局部变量在 Block 内部是无法被赋值的,如果赋值编译器会报错。默认情况下,被捕获的局部变量在 Block 的实现结构体中是一个成员变量。

__block 修饰符的作用是,将这个临时变量变成一个对象存储起来。

还是上述对基本类型的临时变量的捕获的例子,我们加上 __block 修饰符:

1
2
3
4
5
6
7
8
9
10
11
12
13
14
15
16
17
#import <Foundation/Foundation.h>

int main(int argc, const char * argv[]) {
@autoreleasepool {

__block int anInteger = 5; // 加上 __block 修饰符

void (^simpleBlock)(void) = ^{
NSLog(@"Integer is %d", anInteger);
};

anInteger = 10;

simpleBlock(); // 加上 __block 修饰符后,打印结果变成了 10
}
return 0;
}

编译后的结果为:

1
2
3
4
5
6
7
8
9
10
11
12
13
14
15
16
17
18
19
20
21

// 针对 anInteger 变量专门创建了一个结构体
struct __Block_byref_anInteger_0 {
void *__isa; // 拥有 isa
__Block_byref_anInteger_0 *__forwarding; // 转发指针,栈区 Block 在 copy 之前都是指向自己
int __flags;
int __size;
int anInteger; // 这里存储变量的值
};

struct __main_block_impl_0 {
struct __block_impl impl;
struct __main_block_desc_0* Desc;
__Block_byref_anInteger_0 *anInteger; // by ref // 之前是直接捕获,现在变成了一个结构体指针
__main_block_impl_0(void *fp, struct __main_block_desc_0 *desc, __Block_byref_anInteger_0 *_anInteger, int flags=0) : anInteger(_anInteger->__forwarding) {
impl.isa = &_NSConcreteStackBlock;
impl.Flags = flags;
impl.FuncPtr = fp;
Desc = desc;
}
};

结论:

  • 临时变量被捕获后在 Block 内部无法被修改,因为是值类型
  • 静态变量和全局变量都不涉及 __block 修饰符
  • 加上 __block 修饰符后,变量变成对象存储起来,并且在 Block 内外进行修改都是在操作这个对象。

__forwarding

继续上面的例子,我们查看 __main_block_func_0 函数,也就是 Block 的具体函数实现。

1
2
3
4
5
static void __main_block_func_0(struct __main_block_impl_0 *__cself) {
__Block_byref_anInteger_0 *anInteger = __cself->anInteger; // bound by ref

NSLog((NSString *)&__NSConstantStringImpl__var_folders_q4_jm3g73557p74v3ncp13gq3l00000gn_T_main_5fc99a_mi_0, (anInteger->__forwarding->anInteger));
}

可以看到,使用 NSLog() 打印这个变量时,并不是直接从 __Block_byref_anInteger_0 结构体中取出 anInteger,而是通过它的 __forwarding 绕了一下,即 anInteger->__forwarding->anInteger
这个例子中,Block 就是一个栈区的 Block,这个 __forwarding 就是指向本身栈区创建的这个结构体,因此不管直接取值还是通过指针取值最终都是一样的。

Block 的内存管理

Block 分三种类型,分别是栈区 Block、堆区 Block 和全局 Block

Block类别 Copy结果
_NSConcreteStackBlock
_NSConcreteMallocBlock 增加引用计数
_NSConcreteGlobalBlock 数据区 什么也不做

关于 copy 操作,当栈区 Block 拷贝一份到堆区后,会产生一份一样的 Block 在堆区,唯一不同的是,__block 修饰的变量对象在拷贝一份后,堆区的那个其 __forwarding 依旧指向自己,但是栈区的这个其 __forwarding 指针指向的是对应的堆区的那个对象。

因此,__forwarding 保证了不管是否有 copy 操作,最终操作的 __block 变量都是同一个。

References

  1. Blocks Programming Topics
  2. Working with Blocks
  3. How Do I Declare A Block in Objective-C?
  4. 你真的理解__block修饰符的原理么?
  5. 对 Strong-Weak Dance的思考
  6. iOS 中的 block 是如何持有对象的
  7. OC与Swift闭包对比总结
  8. iOS中Block的用法,示例,应用场景,与底层原理解析

objc_getClass

通过字符串获取某一个类。

1
2
3
4
// 通过字符串获取到这个类然后生成一个实例。
Class cls = objc_getClass("Person");
Person *p = [cls new];
[p hello];

objc_getMetaClass 是通过一个字符串获取元类。
object_getClass 是通过一个对象获取其 isa

class_getName

通过一个类获取类名字符串。

1
NSLog(@"%s", class_getName([Person class]));

class_copyIvarList

class_copyIvarList 可以获取变量列表,之后 ivar_getName 可以获得变量名,ivar_getTypeEncoding 可以获得变量类型。

1
2
3
4
5
6
7
8
9
10
11
12
13
14
15
unsigned int outCount = 0;
Ivar *ivarList = class_copyIvarList([Person class], &outCount);

for (NSUInteger i = 0; i < outCount; i++) {
Ivar ivar = ivarList[i];
NSLog(@"%s", ivar_getName(ivar));
NSLog(@"%s", ivar_getTypeEncoding(ivar));
}

/*
_name
@"NSString"
_age
q
*/

class_copyPropertyList

class_copyPropertyList 用于获取属性列表。property_getName 用于获取属性名,property_getAttributes 用于获取属性内容。

其中,关于属性中编码含义参见 Declared Properties

1
2
3
4
5
6
7
8
9
10
11
12
13
14
15
unsigned int outCount = 0;
objc_property_t *propertyList = class_copyPropertyList([Person class], &outCount);

for (NSUInteger i = 0; i < outCount; i++) {
objc_property_t p = propertyList[i];
NSLog(@"%s", property_getName(p));
NSLog(@"%s", property_getAttributes(p));
}

/*
name
T@"NSString",C,N,V_name
age
Tq,N,V_age
*/

class_copyMethodList

class_copyMethodList 用于获取方法列表

1
2
3
4
5
6
7
8
9
10
11
12
13
14
15
16
17
18
19
20
21
22
23
unsigned int outCount = 0;
Method *methodList = class_copyMethodList([Person class], &outCount);

NSMutableDictionary *dict = [NSMutableDictionary dictionary];
for (NSUInteger i = 0; i < outCount; i++) {
Method method = methodList[i];
SEL sel = method_getName(method);
dict[NSStringFromSelector(sel)] = [NSString stringWithUTF8String:method_getTypeEncoding(method)];
}
NSLog(@"%@", dict);

/*
{
".cxx_destruct" = "v16@0:8";
age = "q16@0:8";
"helloTo:" = "v24@0:8@16";
name = "@16@0:8";
"setAge:" = "v24@0:8q16";
"setName:" = "v24@0:8@16";
walk = "v16@0:8";
}
*/

class_copyProtocolList

class_copyProtocolList 用于获取协议列表。

1
__unsafe_unretained Protocol **protocolList = class_copyProtocolList([Person class], &outCount);

class_addIvar

class_addIvar 用于动态添加变量。一个编译好的类是无法添加变量的,但是我们是动态创建并注册一个类,在注册之前为其动态添加变量。

1
2
3
4
5
6
7
8
9
10
11
12
13
14
15
16
17
18
// 给类分配空间
Class Game = objc_allocateClassPair([NSObject class], "Game", 0);

// 添加变量
BOOL isAdded = class_addIvar(Game, "name", sizeof(NSString *), log2(sizeof(NSString *)), @encode(NSString *));

// 注册类
objc_registerClassPair(Game);

if (isAdded) {
id game = [[Game alloc] init];
[game setValue:@"mario" forKey:@"name"];
NSLog(@"%@", game);
NSLog(@"%@", [game valueForKey:@"name"]);
}

// <Game: 0x1006aaba0>
// mario

class_addMethod

即使是以及编译好的类,也可以动态添加方法。

1
2
3
4
5
6
7
8
9
10
11
12

// 获取方法
Method method = class_getInstanceMethod([Person class], @selector(hello));
// 获取方法实现
IMP methodIMP = method_getImplementation(method);
// 获取方法类型(即返回值、参数类型)
const char *types = method_getTypeEncoding(method);

class_addMethod([Animal class], @selector(hi), methodIMP, types);

Animal *a = [Animal new];
[a hi];

本例将 Person 类的一个方法添加给了 Animal 类中。

method_exchangeImplementations

method_exchangeImplementations 用于交换两个方法的实现。

1
2
3
4
5
6
7
8
9
10
11
12
13

Method method1 = class_getInstanceMethod([Person class], @selector(hello));

Method method2 = class_getInstanceMethod([Person class], @selector(walk));

method_exchangeImplementations(method1, method2);

Person *p = [Person new];
[p hello];
[p walk];

// Walk!
// Hello!

本例我们交换了两个方法的实现,最终调用 hello 输出 Walk!,调用 walk 输出 Hello!

ObjC 中的方法调用是一个传递消息的过程,它不是直接去调用一个函数,而是通过 selector 去查找 IMP 的过程,最终查找到函数指针,然后执行具体函数实现;如果没有找到函数实现,还会继续执行消息转发流程,最后仍没有查找到函数实现,就报错崩溃。

objc_msgSend 函数

1
2
3
4
5
// message.h

OBJC_EXPORT id _Nullable
objc_msgSend(id _Nullable self, SEL _Nonnull op, ...)
OBJC_AVAILABLE(10.0, 2.0, 9.0, 1.0, 2.0);

ObjC 通常的方法调用实质上就是调用 objc_msgSend 函数。

如下代码:

1
2
Person *olivia = [[Person alloc] init];
[olivia sayHi];

使用命令 clang -rewrite-objc main.m 编译成 C++ 代码后如下:

1
2
Person *olivia = ((Person *(*)(id, SEL))(void *)objc_msgSend)((id)((Person *(*)(id, SEL))(void *)objc_msgSend)((id)objc_getClass("Person"), sel_registerName("alloc")), sel_registerName("init"));
((void (*)(id, SEL))(void *)objc_msgSend)((id)olivia, sel_registerName("sayHi"));

如果是使用 super 关键字,则调用的是 objc_msgSendSuper 函数。

消息发送流程

  1. 检查 selector 是否要忽略,比如自动引用计数下 retainrelease 方法将会被忽略。
  2. 检查 target 是否为 nil,如果为 nil 则直接返回 nil
  3. 通过 selector 查找具体的 IMP,首先查找缓存列表。具体方法就是通过一个哈希函数将 SEL 映射到指定的 bucket_t 在数组中的位置。
  4. 如果换成列表没有,开始查找方法列表。对于已排序好的列表,采用 二分查找法 进行查找。对于没有排序好的列表,就进行遍历查找。如果查找到了会将对应的 IMP 放入方法缓存列表中。
  5. 如果方法列表没有,逐级查找父类缓存列表和方法列表,最终直到查找 NSObject 类。
  6. 进入动态方法解析、消息转发流程。

消息转发

动态方法解析

如果给一个对象发送消息,该对象并没有对应的方法实现,那么程序不会直接崩溃,首先会进入动态方法解析的过程。

1
2
3
4
// NSObject.h

+ (BOOL)resolveClassMethod:(SEL)sel OBJC_AVAILABLE(10.5, 2.0, 9.0, 1.0, 2.0);
+ (BOOL)resolveInstanceMethod:(SEL)sel OBJC_AVAILABLE(10.5, 2.0, 9.0, 1.0, 2.0);

动态方法解析核心是上述两个方法(都是 NSObject 的类方法),分别解决类方法和实例方法。当对象没有对应方法实现的时候,上述方法就是第一个补救措施。

对于 @dynamic 关键字到属性,系统不提供 settergetter 方法实现,就需要在动态方法解析中为其动态添加两个方法实现。

动态添加方法

1
2
3
4
5
6
7
8
9
10
11
12
13
14
15
16
17
18
19
20
21
22
23
24
25
26
27
28
29
30
31
void playIMP(id self, SEL _cmd) {
NSLog(@"Game Start!");
}

void playWithTypeIMP(id self, SEL _cmd, GameType type) {
switch (type) {
case GameTypeOne:
NSLog(@"Game Type One Start!");
break;
case GameTypeTwo:
NSLog(@"Game Type Two Start!");
break;
case GameTypeThree:
NSLog(@"Game Type Three Start!");
break;
default:
break;
}
}

+ (BOOL)resolveInstanceMethod:(SEL)sel {
if (sel == @selector(play)) {
class_addMethod(self, sel, (IMP)playIMP, "v@:");
return YES;
} else if (sel == @selector(playWith:)) {
class_addMethod(self, sel, (IMP)playWithTypeIMP, "v@:i");
return YES;
}

return [super resolveInstanceMethod:sel];
}

resolveInstanceMethod 方法中,使用 class_addMethod 函数为指定的类动态添加方法。

消息重定向

如果 resolveInstanceMethod: 方法中没有找到方法实现,将会进入第二个补救措施,就是消息重定向 forwardingTargetForSelector:,这个方法可以将消息的接受者更换为其他对象。

1
2
3
4
5
6
7
8
- (id)forwardingTargetForSelector:(SEL)aSelector {

if (aSelector == @selector(play)) {
return [SecondGame new]; // 返回一个其他的对象,如果这个对象存在这个方法实现的话
}

return nil;
}

转发

如果上述方法返回 nil,则会进入到最后一个补救方法中,即消息转发流程。

1
2
3
4
5
6
7
8
9
10
11
12
13
14
15
16
17
18
19
20
21
- (NSMethodSignature *)methodSignatureForSelector:(SEL)aSelector {
if (aSelector == @selector(play)) {

// 这里返回方法签名
return [NSMethodSignature signatureWithObjCTypes:"v@:"];
// 上面是直接写,下面是返回一个方法的 types,都可以
// return [self methodSignatureForSelector:@selector(anotherPlay)];
}

return [super methodSignatureForSelector:aSelector];
}

- (void)forwardInvocation:(NSInvocation *)anInvocation {

// 使用另一个方法实现做代替
if (anInvocation.selector == @selector(play)) {
anInvocation.selector = @selector(anotherPlay);
// 也可以是其他类,看实际情况。
[anInvocation invokeWithTarget:self];
}
}

最终这里可以实现,让原本的消息接受者去执行一个其他的方法,也可以更好消息接受者,去执行一个指定的方法,都是可以的。

模拟继承

使用消息转发的原理,可以实现模拟多继承,我们定义一个 Person 类和一个 Machine 类,并定义一个 Robot 类对前两个类进行继承。

1
2
3
4
5
6
7
8
9
10
11
12
13
14
15
16
17
18
19
20
21
22
23
24
25
26
27
28
29
30
31
32
33
34
35
36
37
38
39
40
41
42
43
44
45
46
47
48
49
50
51
52
53
54
55
56
57
58
59
60
61
62
63
64
65
66
67
68
69
70
71
// Person

@interface Person : NSObject

- (void)hello;

@end
@implementation Person

- (void)hello {
NSLog(@"Hello World!");
}

@end

// Machine

@interface Machine : NSObject

- (void)lubricate;

@end
@implementation Machine

- (void)lubricate {
NSLog(@"Lubricate.");
}

// Robot
@interface Robot : NSObject

- (void)hello;
- (void)lubricate;

@end

#import "Robot.h"
#import "Person.h"
#import "Machine.h"

@interface Robot ()

@property (nonatomic, strong) Person *person;
@property (nonatomic, strong) Machine *machine;

@end

@implementation Robot

- (instancetype)init {
self = [super init];

if (self) {
self.person = [[Person alloc] init];
self.machine = [[Machine alloc] init];
}

return self;
}

- (id)forwardingTargetForSelector:(SEL)aSelector {
if ([self.person respondsToSelector:aSelector]) {
return self.person;
} else if ([self.machine respondsToSelector:aSelector]) {
return self.machine;
} else {
return [super forwardingTargetForSelector:aSelector];
}
}

@end

理解常用数据结构

观察 NSObject 类的结构:

1
2
3
4
5
6
7
8
9
OBJC_AVAILABLE(10.0, 2.0, 9.0, 1.0, 2.0)
OBJC_ROOT_CLASS
OBJC_EXPORT
@interface NSObject <NSObject> {
#pragma clang diagnostic push
#pragma clang diagnostic ignored "-Wobjc-interface-ivars"
Class isa OBJC_ISA_AVAILABILITY;
#pragma clang diagnostic pop
}

可以看到,NSObject 类遵守同名的 NSObject 协议,其类的内部拥有唯一的成员变量 isaisaClass 类型。

objc_class

1
2
3
// Object.mm

typedef struct objc_class *Class;

Class 就是 ObjC 中类的实现,本质上是一个结构体指针,这个结构体是 objc_class

1
2
3
4
5
6
7
8
9
10
11
12
13
14
// objc-runtime-new.h

struct objc_class : objc_object {
// Class ISA;
Class superclass; // 父类
cache_t cache; // formerly cache pointer and vtable // 方法缓存
class_data_bits_t bits; // class_rw_t * plus custom rr/alloc flags // 类信息,包括变量、属性、方法等

class_rw_t *data() const {
return bits.data();
} // 把类信息中的可读写部分暴露出来

// ...
};

上述代码总结如下内容:

  • objc_class 继承自 objc_object,也就是说,类本质上也是一个对象,称为类对象。
  • Class superclass 类对象拥有继承体系。
  • cache_t cache 为方法缓存,用于快速查找。
  • class_data_bits_t 存储的类的信息。

cache_t

cache_t 为方法缓存,用于快速查找方法的执行函数。常规的方法调用,需要通过 isa 先去其类对象的方法列表中查找,找不到就去查找父类,依次查找到 NSObject 类,如果一些方法经常被调用,这样的方式效率较低,所以就设置一个方法缓存,当某个方法被调用过,就将其放入方法缓存列表,之后就优先查找方法缓存。

cache_t 是一个可增量扩展的哈希表结构,使用哈希表实现可以提高查找效率。

cache_t 可以简单理解为由一组 bucket_t 结构组成,后者的主要构成是 SELIMP

1
2
3
4
5
6
7
8
9
10
11
12
13
14
// objc-runtime-new.h

struct cache_t {

// ...
public:
static bucket_t *emptyBuckets();

struct bucket_t *buckets();
mask_t mask();
mask_t occupied();

// ...
};

bucket_t

1
2
3
4
5
6
7
8
9
10
11
12
13
14
15
16
// objc-runtime-new.h

struct bucket_t {
private:
// IMP-first is better for arm64e ptrauth and no worse for arm64.
// SEL-first is better for armv7* and i386 and x86_64.
#if __arm64__
explicit_atomic<uintptr_t> _imp; // 无类型的函数指针,对应具体的函数实现
explicit_atomic<SEL> _sel; // 方法选择器
#else
explicit_atomic<SEL> _sel;
explicit_atomic<uintptr_t> _imp;
#endif

// ...
};

通过 SEL 可以找到对应的 IMP

class_data_bits_t

1
2
3
4
5
6
7
8
9
10
11
12
13
14
15
16
17
18
19
20
21
22
23
24
25
26
27
28
29
30
31
32
33
34
// objc-runtime-new.h

struct class_data_bits_t {
friend objc_class;

// Values are the FAST_ flags above.
uintptr_t bits;

// ...

public:

class_rw_t* data() const {
return (class_rw_t *)(bits & FAST_DATA_MASK);
} // data,存储可动态改变的部分,内部还包含只读的部分

// ...

// Get the class's ro data, even in the presence of concurrent realization.
// fixme this isn't really safe without a compiler barrier at least
// and probably a memory barrier when realizeClass changes the data field
const class_ro_t *safe_ro() {
class_rw_t *maybe_rw = data();
if (maybe_rw->flags & RW_REALIZED) {
// maybe_rw is rw
return maybe_rw->ro;
} else {
// maybe_rw is actually ro
return (class_ro_t *)maybe_rw;
}
} // 将只读部分暴露出来

// ...
};

class_data_bits_t 主要是对 class_rw_t 的封装。

class_rw_t

class_rw_t 存储类相关的读写信息,还包含 class_ro_t

我们通常为类动态添加的方法、属性、协议都是在这里进行实现。

1
2
3
4
5
6
7
8
9
10
11
12
13
14
15
16
17
18
19
20
21
// objc-runtime-new.h

struct class_rw_t {
// Be warned that Symbolication knows the layout of this structure.
uint32_t flags;
uint16_t version;
uint16_t witness;

const class_ro_t *ro; // 编译就确定,不能动态修改

method_array_t methods; // 方法列表
property_array_t properties; // 属性列表
protocol_array_t protocols; // 协议列表

Class firstSubclass;
Class nextSiblingClass;

char *demangledName;

// ...
};

主要包含:

  • const class_ro_t *ro
  • method_array_t methods,方法列表
  • property_array_t properties,属性列表
  • protocol_array_t protocols,协议列表

其中 method_array_tproperty_array_tprotocol_array_t 都是二维数组结构。

如果一个分类,分类中有若干方法,这一组方法就组成一个数组,然后这个数组作为 methods 的其中一个元素。

所以 methods 最终的组成元素就是一个个具体的方法,是 method_t 结构,属性和协议也类似。

class_ro_t

class_ro_t 代表了类的相关只读信息,这些内容在编译时就确定。

1
2
3
4
5
6
7
8
9
10
11
12
13
14
15
16
17
18
19
20
21
22
23
24
25
26
27
28
// objc-runtime-new.h

struct class_ro_t {
uint32_t flags;
uint32_t instanceStart;
uint32_t instanceSize;
#ifdef __LP64__
uint32_t reserved;
#endif

const uint8_t * ivarLayout;

const char * name; // 类名
method_list_t * baseMethodList; // 方法列表
protocol_list_t * baseProtocols; // 协议列表
const ivar_list_t * ivars; // 变量列表

const uint8_t * weakIvarLayout;
property_list_t *baseProperties; // 属性列表

// ...

method_list_t *baseMethods() const {
return baseMethodList;
}

// ...
};

主要包含:

  • const char * name,类名
  • method_list_t * baseMethodList,方法列表
  • protocol_list_t * baseProtocols,协议列表
  • const ivar_list_t * ivars,变量列表
  • property_list_t *baseProperties,属性列表

这里的列表都是一维数组,代表本类中最初设置的方法、属性等。

method_t

1
2
3
4
5
6
7
8
9
10
11
12
13
14
15
16
// objc-runtime-new.h

struct method_t {
SEL name; // 方法名
const char *types; // 方法类型
MethodListIMP imp; // 方法实现地址

struct SortBySELAddress :
public std::binary_function<const method_t&,
const method_t&, bool>
{
bool operator() (const method_t& lhs,
const method_t& rhs)
{ return lhs.name < rhs.name; }
};
};

函数四要素有:函数名、返回值、参数、函数体。

method_t 中主要包含:

  • SEL name,包含方法名和参数个数信息
  • const char *types,包含函数返回值和参数类型
  • MethodListIMP imp,方法实现地址

关于 types,需要参考 Type Encodings,一个方法的返回值以及参数类型,苹果定义了不同的字符来进行表示,其中第一个是返回值类型,后续依次接参数。

-(void)aMethod 方法,types 存储应该是 v@:,通过查表,三个字符分布代表 voididSEL,也就是说这个方法的返回值是 void,第一个参数是消息接受者,第二个参数是 SEL

protocol_t

1
2
3
4
5
6
7
8
9
10
11
12
13
// objc-runtime-new.h

struct protocol_t : objc_object { // 协议也是一个对象
const char *mangledName; // 协议名
struct protocol_list_t *protocols; // 协议列表
method_list_t *instanceMethods; // 实例方法
method_list_t *classMethods; // 类方法
method_list_t *optionalInstanceMethods; // 可选实例方法
method_list_t *optionalClassMethods; // 可选类方法
property_list_t *instanceProperties; // 实例属性

// ...
};

ivar_t

1
2
3
4
5
6
7
8
9
10
11
12
13
14
15
16
17
18
19
20
21
22
23
// objc-runtime-new.h

struct ivar_t {
#if __x86_64__
// *offset was originally 64-bit on some x86_64 platforms.
// We read and write only 32 bits of it.
// Some metadata provides all 64 bits. This is harmless for unsigned
// little-endian values.
// Some code uses all 64 bits. class_addIvar() over-allocates the
// offset for their benefit.
#endif
int32_t *offset; // 地址的偏移
const char *name; // 变量名
const char *type; // 变量类型
// alignment is sometimes -1; use alignment() instead
uint32_t alignment_raw;
uint32_t size;

uint32_t alignment() const {
if (alignment_raw == ~(uint32_t)0) return 1U << WORD_SHIFT;
return 1 << alignment_raw;
}
};

property_t

1
2
3
4
5
6
// objc-runtime-new.h

struct property_t {
const char *name; // 属性名
const char *attributes; // 属性修饰符
};

objc_object

ObjC 中的 id 类型本质上就是一个 objc_object 的结构体指针,objc_object 结构体其实就是 ObjC 中对对象的实现。objc_class 继承自 objc_object,就是说,类也是对象。

1
2
3
Object.mm

typedef struct objc_object *id;
1
2
3
4
5
6
7
8
9
10
11
12
// objc-private.h

struct objc_object {
private:
isa_t isa;

// 关于 isa 的一些相关操作,如通过 isa 获取类对象、元类对象
// 弱引用相关方法
// 关联对象相关方法
// 内存管理相关方法
// ...
};

isa

objc_object 中存在一个成员变量 isa,拥有 isa 在 ObjC 中就是对象。

1
2
3
4
5
6
7
8
9
10
11
12
13
14
// objc-private.h

union isa_t {
isa_t() { }
isa_t(uintptr_t value) : bits(value) { }

Class cls;
uintptr_t bits;
#if defined(ISA_BITFIELD)
struct {
ISA_BITFIELD; // defined in isa.h
};
#endif
};

isa 是一个联合体,在 64 位机器上这个共用体就是 64 位的(32 位下就是 32 位的)。

isa 可能是指针型的,也可能是非指针型的。
指针型就是说这个联合体的内容存储的就是一个指针,比如一个对象的 isa 指针找到对象的类对象。
非指针型的是说,这个联合体中的部分位代表地址,其他位表示一些其他信息。因为 64 位用于存储地址是多余的,只需要部分位已经能满足寻址需要,那么其他剩余的位置就可以存储一些别的。

isa 不总是指向实例所属的类,比如 KVO 就是将被观察对象的 isa 指向一个中间类。确定实例所属的类应该使用 class 方法。

1
2
3
4
5
6
7
8
9
10
11
12
// isa.h

# define ISA_BITFIELD \
uintptr_t nonpointer : 1; \
uintptr_t has_assoc : 1; \
uintptr_t has_cxx_dtor : 1; \
uintptr_t shiftcls : 33; /*MACH_VM_MAX_ADDRESS 0x1000000000*/ \
uintptr_t magic : 6; \
uintptr_t weakly_referenced : 1; \
uintptr_t deallocating : 1; \
uintptr_t has_sidetable_rc : 1; \
uintptr_t extra_rc : 19

对象模型

除了一个特殊类 NSProxyNSObject 类是所有类最终的父类(包括 NSObject 元类),NSObject 元类是所有类的元类(包括它自己)。

对象方法是存储在类对象的方法列表中,类方法是存储在元类对象的方法列表中。

图 1 - 对象模型

1
2
3
4
5
6
7
8
9
10
11
12
13
14
15
16
17
18
19
20
21
22
23
24
25
26
27
28
29
30
31
32
33
34
35
36
37
38
39
40
41
42
43
44
45
46
47
48
49
50
NSLog(@"Person实例地址:%@", self);

Class personClass = objc_getClass("Person");
NSLog(@"Person类对象地址:%p", personClass);

Class personMetaClass = objc_getMetaClass("Person");
NSLog(@"Person元类对象地址:%p", personMetaClass);

Class personSuperClass = class_getSuperclass(personClass);
NSLog(@"Person父类类对象地址:%p", personSuperClass);

NSObject *obj = [NSObject new];
NSLog(@"NSObject实例地址:%@", obj);

Class objectClass = objc_getClass("NSObject");
NSLog(@"NSObject类对象地址:%p", objectClass);

Class objectMetaClass = objc_getMetaClass("NSObject");
NSLog(@"NSObject元类对象地址:%p", objectMetaClass);

Class objectSuperClass = class_getSuperclass(objectClass);
NSLog(@"NSObject父类类对象地址:%p", objectSuperClass);

NSLog(@"Person实例对象的isa:%p", object_getClass(self));
NSLog(@"Person类对象的isa:%p", object_getClass(personClass));
NSLog(@"Person元类对象的isa:%p", object_getClass(personMetaClass));

NSLog(@"NSObject实例对象的isa:%p", object_getClass(obj));
NSLog(@"NSObject类对象的isa:%p", object_getClass(objectClass));
NSLog(@"NSObject元类对象的isa:%p", object_getClass(objectMetaClass));

/*
Person实例地址:<Person: 0x1005b5ef0>
Person类对象地址:0x100003208
Person元类对象地址:0x1000031e0
Person父类类对象地址:0x7fff970c7118

NSObject实例地址:<NSObject: 0x103804920>
NSObject类对象地址:0x7fff970c7118
NSObject元类对象地址:0x7fff970c70f0
NSObject父类类对象地址:0x0

Person实例对象的isa:0x100003208
Person类对象的isa:0x1000031e0
Person元类对象的isa:0x7fff970c70f0

NSObject实例对象的isa:0x7fff970c7118
NSObject类对象的isa:0x7fff970c70f0
NSObject元类对象的isa:0x7fff970c70f0
*/

关于对象模型的若干知识点

调用类方法最终却调用了实例方法

由于 NSObject 元类对象父类是 NSObject 类对象,所以如果调用 NSObject 类方法没有对应实现,但是 NSObject 存在同名的对象方法时,会最终调用到该对象方法。

super 关键字的实质

super 不是一个指针,而是一个关键字,使用 super 的含义就是查找方法时,不在本类的类对象方法列表中查找,而是跳过他,直接从父类的类对象方法列表中开始进行查找。但是消息接受者都是实例本身。

如下面试题:

1
2
3
4
5
6
7
8
9
10
11
12
13
14
15
16
17
18
19
20
21
22
23
24
25
26
27
28
29
@interface Person : NSObject

@property (nonatomic, copy) NSString *name;

@end

@implementation Person

@end

@interface Student : Person

@end

@implementation Student

- (instancetype)init {
self = [super init];

if (self) {

NSLog(@"%@", NSStringFromClass([self class])); // Student
NSLog(@"%@", NSStringFromClass([super class])); // Student
}

return self;
}

@end

最终两个打印结果都是 Student,原因是两者的方法接受者都是同一个实例,只不过查找方法时,一个是从本类的类对象开始,一个是从父类的类对象开始,但由于 class 方法是 NSObject 中的方法,最终都是寻找到根类然后执行,所以两者其实不管是调用者还是最终调用到的函数都是相同的。

[self class] 本质上是调用 objc_msgSend(id _Nullable self, SEL _Nonnull op, ...)[super class] 本质上是调用 objc_msgSendSuper(struct objc_super * _Nonnull super, SEL _Nonnull op, ...)。其中 objc_super 结构如下:

1
2
3
4
5
6
7
8
9
10
11
12
13
14
15

/// Specifies the superclass of an instance.
struct objc_super {
/// Specifies an instance of a class.
__unsafe_unretained _Nonnull id receiver; // 还是调用者本身

/// Specifies the particular superclass of the instance to message.
#if !defined(__cplusplus) && !__OBJC2__
/* For compatibility with old objc-runtime.h header */
__unsafe_unretained _Nonnull Class class;
#else
__unsafe_unretained _Nonnull Class super_class;
#endif
/* super_class is the first class to search */
};

其中的 receiver 就是调用者本身。

本系列笔记参考 Runtime 源码为 objc4-779.1

什么是 Runtime

Runtime 是一套使用 C、C++、汇编实现的 API,调用 ObjC 方法时,实际上是执行的 Runtime 接口,最终执行的其实是 C/C++ 代码。

Runtime 可以理解为构成 ObjC 语言的一部分。ObjC 为 C 语言加上的面向对象的特性,通过 Clang 编译器和 Runtime 实现。

编译 ObjC 文件

使用 clang -rewrite-objc Hello.m 命令。

使用 Runtime

ObjC 方法调用

ObjC 方法调用本质上就是在调用 Runtime 的 API,比如使用 ObjC 编写如下代码:

1
2
Person *olivia = [[Person alloc] init];
[olivia sayHi];

使用命令 clang -rewrite-objc main.m 编译成 C++ 代码后如下:

1
2
Person *olivia = ((Person *(*)(id, SEL))(void *)objc_msgSend)((id)((Person *(*)(id, SEL))(void *)objc_msgSend)((id)objc_getClass("Person"), sel_registerName("alloc")), sel_registerName("init"));
((void (*)(id, SEL))(void *)objc_msgSend)((id)olivia, sel_registerName("sayHi"));

可以看到,ObjC 中调用方法本质上是在调用 objc_msgSend 函数:

1
2
3
4
5
// message.h

OBJC_EXPORT id _Nullable
objc_msgSend(id _Nullable self, SEL _Nonnull op, ...)
OBJC_AVAILABLE(10.0, 2.0, 9.0, 1.0, 2.0);

这个函数第一个参数就是方法的调用者(receiver),第二个参数是 SEL 类型,上面代码中使用 sel_registerName("方法名") 获得,如果方法含有参数,那么就是 objc_msgSend 中第三个以及之后的参数。其中 SEL 就是 方法选择器(selector),我们常常使用 @selector() 获得,它实际上是一个结构体指针。

1
2
3
4
// objc.h

/// An opaque type that represents a method selector.
typedef struct objc_selector *SEL;

sel_registerName 就是通过方法名这个字符串去获得 SEL

1
2
3
OBJC_EXPORT SEL _Nonnull
sel_registerName(const char * _Nonnull str)
OBJC_AVAILABLE(10.0, 2.0, 9.0, 1.0, 2.0);

需要注意的是,这里说的方法名包含参数个数信息,不包含参数类型和返回值类型信息,也就是说,我们可以从一个 SEL 中得到这个方法的名字以及有几个参数(如 sayHi: 表示这个方法具有一个参数),但是无法知道这个方法的返回值类型和参数类型。所以 ObjC 中如果函数名相同且参数个数相同,即使返回值类型和参数类型都不同,编译器也是会报错的。

NSObject 方法

NSObject 中的方法大多都是调用的 Runtime 的 API:

1
2
3
4
5
6
7
8
9
10
11
- (id)performSelector:(SEL)aSelector;
- (id)performSelector:(SEL)aSelector withObject:(id)object;
- (id)performSelector:(SEL)aSelector withObject:(id)object1 withObject:(id)object2;

- (BOOL)isProxy;

- (BOOL)isKindOfClass:(Class)aClass;
- (BOOL)isMemberOfClass:(Class)aClass;
- (BOOL)conformsToProtocol:(Protocol *)aProtocol;

- (BOOL)respondsToSelector:(SEL)aSelector;

直接调用 Runtime 库函数

1
2
#import <objc/runtime.h>
#import <objc/message.h>

可以通过引入 Runtime 头文件,直接调用 Runtime 中的 API,基于 Runtime 的很多实现也是通过调用 Runtime API 完成的。

参考文献

  1. Objective-C Runtime Programming Guide
  2. Objective-C Runtime - 玉令天下的博客
  3. Objective-C 消息发送与转发机制原理 - 玉令天下的博客
  4. Objective-C 引用计数原理 - 玉令天下的博客

Xcode 11 已经有了对 Swift Package 的支持,今后使用 Swift 编写的 iOS 项目就可以开始尝试使用 SwiftPM 逐步替换 CocoaPods 和 Carthage 了。常用的使用 Swift 编写的三方库如 AlamofireMoya 等也都已经支持了 SwiftPM。

本文通过一个例子来介绍 Swift Package 的创建、发布以及使用。

准备工作

由于打算将创建的 Package 发布到 Github,首先需要在 Xcode 上登陆 Github,这将方便后续的上传和下载集成。

Swift Package 的创建

Xcode 快捷键 shift + control + command + N 可以快速创建一个 Swift Package,我们命名为 Hello。创建项目的时候勾选 Create Git repository on my Mac,因为后续还要上传 Github。

创建后,目录中会有一个 Package.swift 文件,一个 Sources 文件夹包含着这个包将要包含的代码,以及一个 Tests 文件夹包含测试文件。

其中,Hello.swift 文件中代码为

1
2
3
struct Hello {
var text = "Hello, World!"
}

由于做成 Package 之后就是跨模块访问,我们加上访问控制关键字,并创建一个构造器(因为默认的构造器是 internal 关键字),然后增加一个方法。

1
2
3
4
5
6
7
8
9
10
11
12
public struct Hello {

var text: String

public init(with text: String = "Hell, World!") { // there is a bug.
self.text = text
}

public func sayHi() -> String {
return text
}
}

之后我们可以提交并上传了,但是这里我们预留了一个 bug。

我们将代码推到 Github 上的流程,可以先在 Github 上创建一个空项目,然后本地和远程仓库关联,也可以直接通过 Xcode 在 Github 上创建一个远程仓库(因为已经在 Xcode 上登陆了 Github,这一步非常简单)。这个仓库完全可以设置为私有的,也就是说我们为自己项目创建的 Package 是可以托管在 Github 上的。

下一步是为当前 Git 版本打标签,这将成为 Package 的版本号。需要说明的是,这个版本号是遵守语义化版本控制规范的,具体可参考 Semantic Versioning 2.0.0。打了标签之后,记得还需要 Push 一次,将标签同步到远程仓库中。至此,我们已经创建一个 Swift Package 并上传到了 Github。

Swift Package 的使用

我们再新建一个项目,名为 Demo,之后尝试添加之前的 Package。

图 1 - 创建 Swift Package

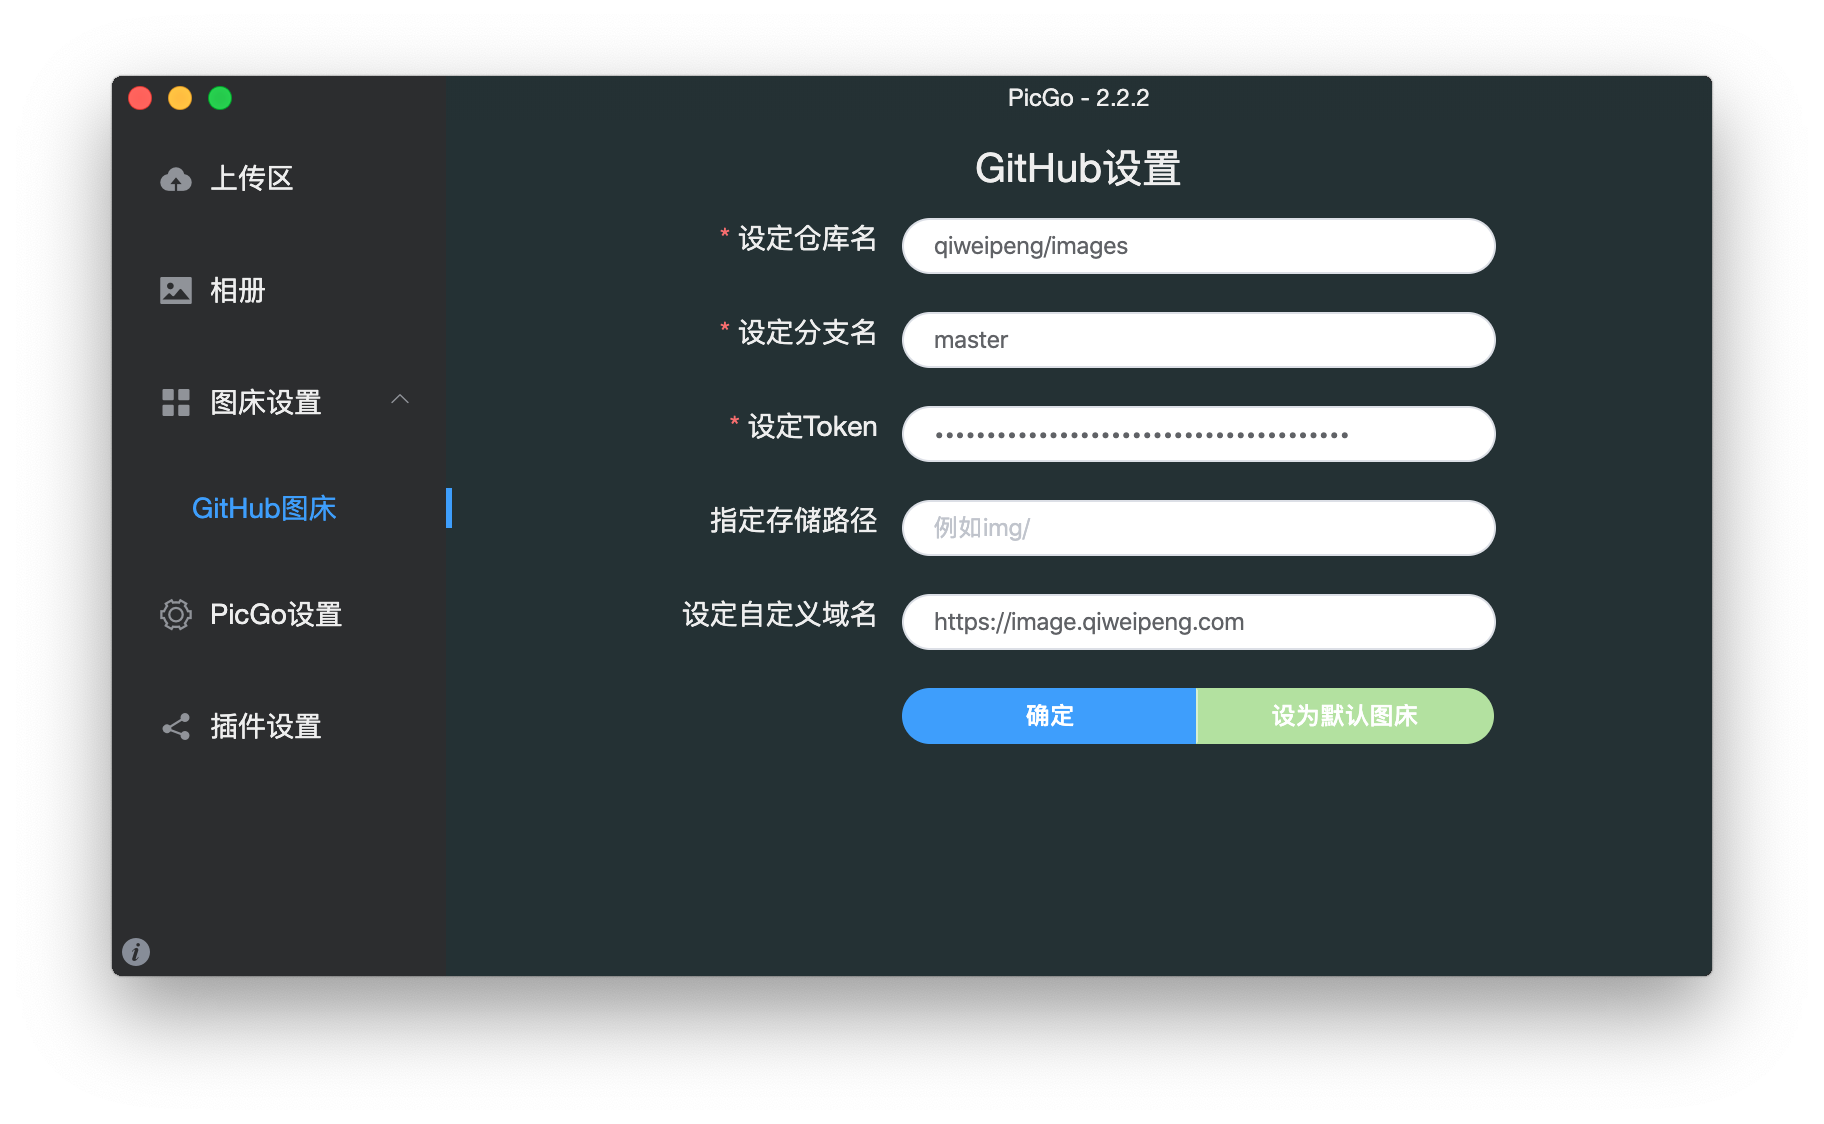
点击加号后,由于已经登陆了 Github,弹出的列表中可以找到之前创建的 Package,当然也可以复制 URL 进行搜索。找到后,会提示我们设置版本规则。其中,默认的 Up to Next Major 的意思是从指定的版本到下个大版本,这样进行小版本更新时,我们可以轻松对 Package 进行更新。再次点击下一步后,会提示选取 Product 以及添加到的 Target,我们都不加修改点击完成。这样,这个 Package 就集成到我们都项目中了。

之后我们在项目中使用一下。

1
2
3
4
5
6
7
8
9
10
//
// main.swift
// Demo
//

import Foundation
import Hello

let hello = Hello()
print(hello.sayHi()) // Hell, World!

至此,我们成功地在项目中集成并使用了一个 Swift Package。

修改 Package

我们这个 Package 是有问题的,输出的不是 Hello 而是 Hell

所以我们进一步可以去修改那个 Package,然后再次上传。对于新的版本需要打一个新的标签,由于只是 bug 修复,新版本就是 1.0.1

之后对于 Demo 项目,要做的只需要更新 Package 到最新版本,操作是 File->Swift Packages->Update to Latest Package Versions,之后这个 Package 就会更新到 1.0.1 版本,这个项目我们不修改任何代码重新运行,打印结果从 Hell, World! 修正为 Hello, World!

参考文献

  1. Adopting Swift Packages in Xcode
  2. Creating Swift Packages