本文记录自己新装电脑后的软件安装和个性化配置,以及之后的维护。
软件安装
App Store
- 1Password
- Spark
- Fantastical
- Todoist
- Notability
- MindNode
- Drafts
- Reeder
- Xcode
- Sequel Ace
- Pages
- Keynote
- Numbers
- WPS Office
- Apple Developer
- Swift Playgrounds
- CloudMounter
- The Unarchiver
- Magnet
- Bear
- Amphetamine
- Petrify
- Cleaner for Xcode
- quicktype
Homebrew
安装 Homebrew:
1 | /bin/bash -c "$(curl -fsSL https://raw.githubusercontent.com/Homebrew/install/HEAD/install.sh)" |
使用 Homebrew 安装软件:
1 | $ brew install <name> |
- mysql
- git
- sqlite
- nvm(如果安装多版本 node)
- node(如果只安装单版本 node)
使用 brew cask 安装应用:
1 | $ brew install --cask <name> |
- android-studio
- google-chrome
oracle-jdk- openjdk
- openjdk@8
- appcleaner
- iina
- pdf-expert
- baidunetdisk
- imazing
- picgo
- db-browser-for-sqlite
- iterm2
- postman
- downie
- moneywiz
- fliqlo
- mweb
- visual-studio-code
- github
- notion
- dash
- sketch
- figma
- feishu
手动安装
- SF Symbols
- ClashX
trojan-qt5
配置和维护
需要激活的 App
- MoneyWiz
- MWeb
- Sketch
- PDF Expert
- Downie
系统配置
System Preferences
General->SideBar icon size:SmallGeneral->Recent items:5Desktop & Screen Saver->Screen Saver: FliqloDesktop & Screen Saver->Start after:5 MinutesDock->Position on screen:LeftDock->Show recent application in Dock:NONotifications: 对所有 App 进行配置Accessibility->Pointer Control->Trackpad Options->Enable dragging:three finger dragSecurity & Privacy->General->Requeire passowrd:5secondsSecurity & Privacy->FileVault:Turn OnSecurity & Privacy->Firewall:Turn OnKeyboard->Text->Correct spelling automatically:NOKeyboard->Input Sources: 增加小鹤双拼Trackpad: 打开所有手势Displays->NightShift:Turn On
Finder
General->New Finder windows show: qiweipengTags: 添加到 Favorite TagsSideBar->Favorites: 仅保留 Applications、Downloads、qiweipeng
Safari
- 首页 ->
Show Frequently Visited:Turn Off General->Open "safe" files after downloading:NoSearch->Search engine:GoogleAdvanced->Show Develop menu in menu bar:YesExtensions: 各个插件具体配置
其它
- FaceTime ->
Ringtone: Hillside - Message ->
Message received sound: Bamboo - 所有的系统 App 打开 iCloud 账户同步功能
Homebrew
常用命令:
1 | $ brew list // 安装的软件列表 |
避免 Homebrew 自动更新:在 ~/.zshrc 文件中写入 export HOMEBREW_NO_AUTO_UPDATE=true。
安装 homebrew-cask-upgrade 方便 cask 应用更新:
1 | $ brew tap buo/cask-upgrade // 安装 |
node
常用命令:
1 | $ npm list // 查看当前目录安装的包 |
如果需要多版本的 node 则可以通过 brew install nvm 安装 nvm,之后通过 nvm 安装和管理各版本的 node。
nvm
安装流程:
1 | brew install nvm |
在 .zshrc 中写入:
1 | export NVM_DIR="$HOME/.nvm" |
安装指定版本:
1 | // 安装 12.16.3 |
查看:
1 | nvm list |
如果安装了多个版本,使用如 nvm use v12.16.3 切换到指定版本(重启终端将恢复默认版本),使用如 nvm alias default v12.16.3 设置默认版本。
CocoaPods
安装 CocoaPods:
1 | $ sudo gem install cocoapods |
CocoaPods 版本更新:首先使用 $ sudo gem install cocoapods 安装最新版本,之后看哪些被更新了($ gem list),再将旧版本卸载掉,比如 $ sudo gem uninstall cocoapods-core -v 1.9.1。
常用命令:
1 | pod repo // 查看本地关联了哪些仓库源 |
Git
参考个人文章《macOS 下 Git 多账号配置,同时管理多个 SSH Key》配置 SSH Key,主要用在 GitHub。
参考个人文章《如何设置 Git 全局忽略 .DS_Store 文件》配置全局忽略文件。
参考个人文章《记录一些 Git 的命令》对 Git 进行配置,如:
1 | // 设置全局的用户名和邮箱 |
Java
使用 brew 安装 openjdk 后,需要关注(使用 brew info openjdk 查看):
1 | For the system Java wrappers to find this JDK, symlink it with |
同样,安装 openjdk@8 后,需要关注(使用 brew info openjdk@8 查看):
1 | For the system Java wrappers to find this JDK, symlink it with |
(这是直接安装 Oracle JDK 时的配置,OpenJDK 也可以做类似配置,或直接在需要时更改 .zshrc 文件中两个版本的声明顺序)如果安装了多个版本的 Java,可在 .zshrc 中写入:
1 | # JDK 8 |
之后可以使用 jdk8 和 jdk15 切换 java 版本。
Xcode
配置 GitHub
登录 GitHub:需要配置 Personal access tokens,命名如 Weipeng's MacBook Pro - Xcode,打开的权限:
- repo
- admin:org
- admin:public_key
- user
代码块
将备份的代码块,即 CodeSnippets 文件夹拖入 ~/Library/Developer/Xcode/UserData 目录内。
偏好设置
Preferences 选中 Behaviors,根据 图 - 1 和 图 - 2 进行设置。
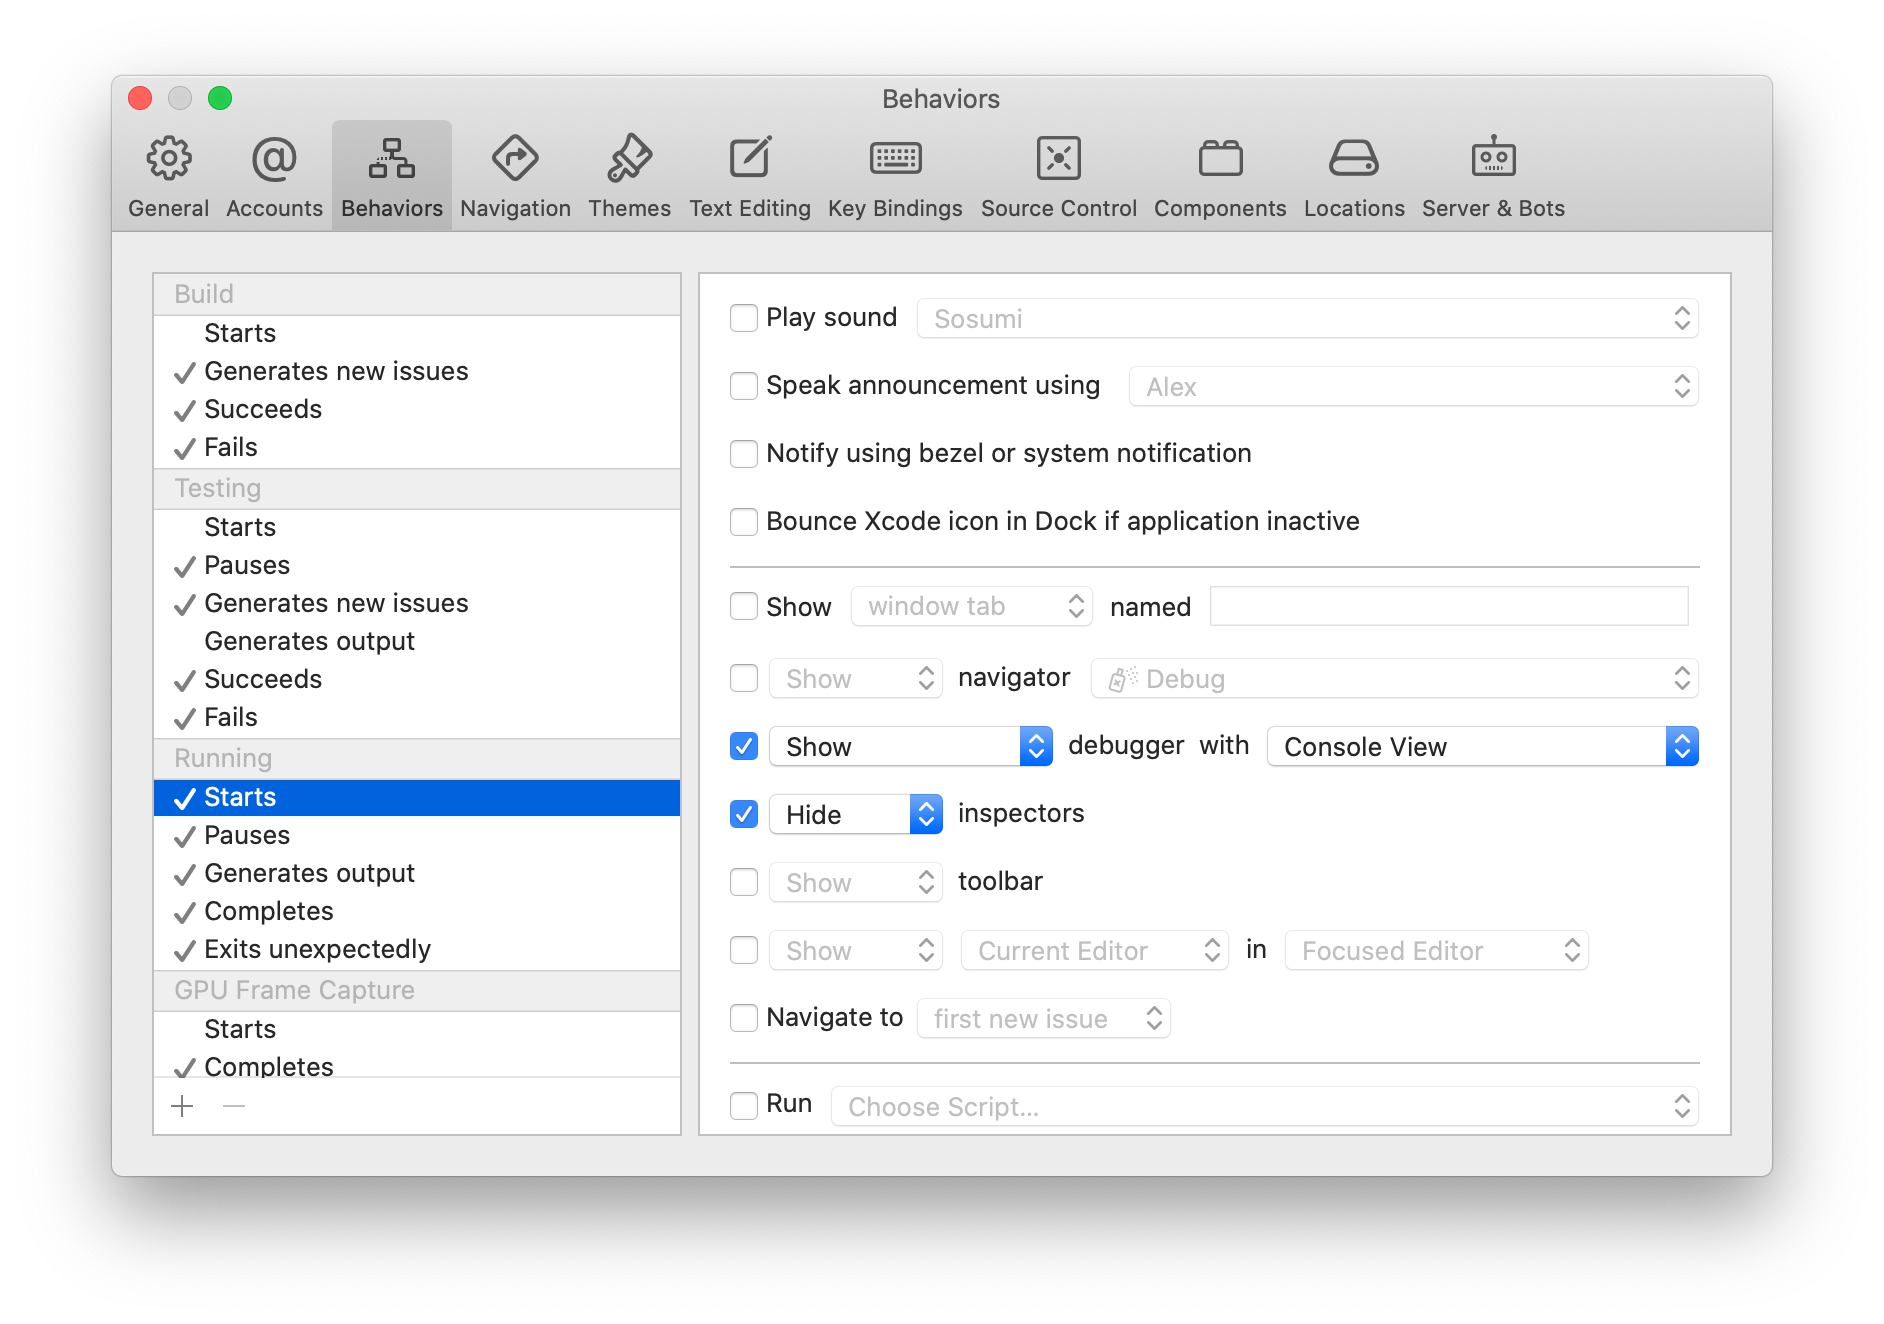
图 - 1: Xcode 偏好设置1

图 - 2: Xcode 偏好设置2
命令行快捷键
创建文件 open_terminal.sh,写入代码:
1 | #!/bin/sh |
之后将脚本保存 ~/Local/Scripts/ 目录下,然后在该目录下执行 chmod +x open_terminal.sh 将脚步设为可执行。
打开 Xcode 的 Preferences,选中 Behaviors,新建并命名为 Open Terminal,快捷键设置为 Control + Command + /,路径选择脚本所在路径。
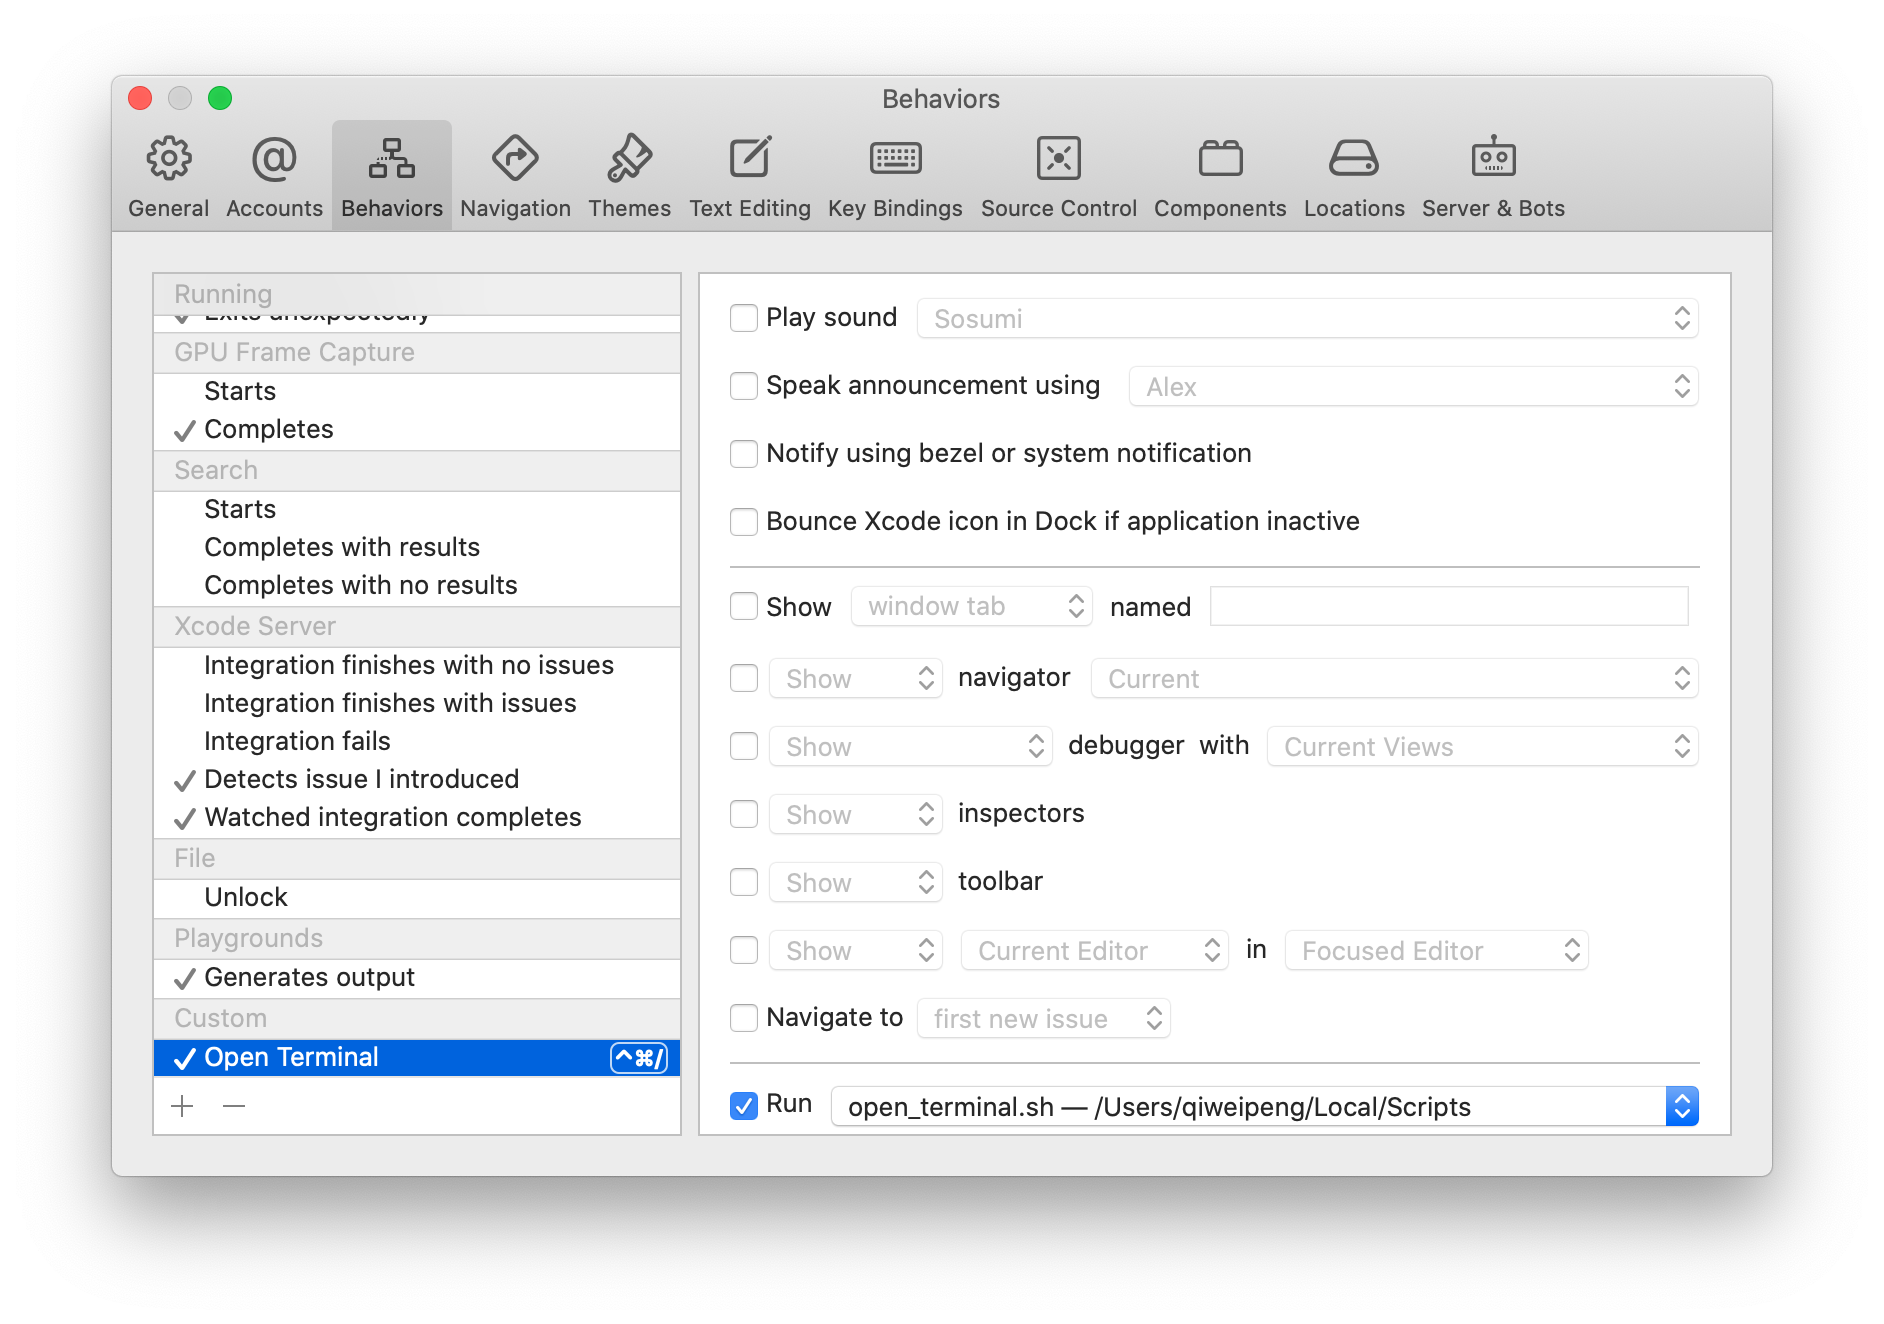
图 - 3: 打开命令行脚本设置
Visual Studio Code
Shift + Command + P 之后找到 Shell Command: Install "code" command in PATH,运行。
登录同步账号:qiweipeng@hotmail.com,登录 Github。
PicGo
打开[上传前重命名]和[时间戳重命名]。
GitHub 图床设置:
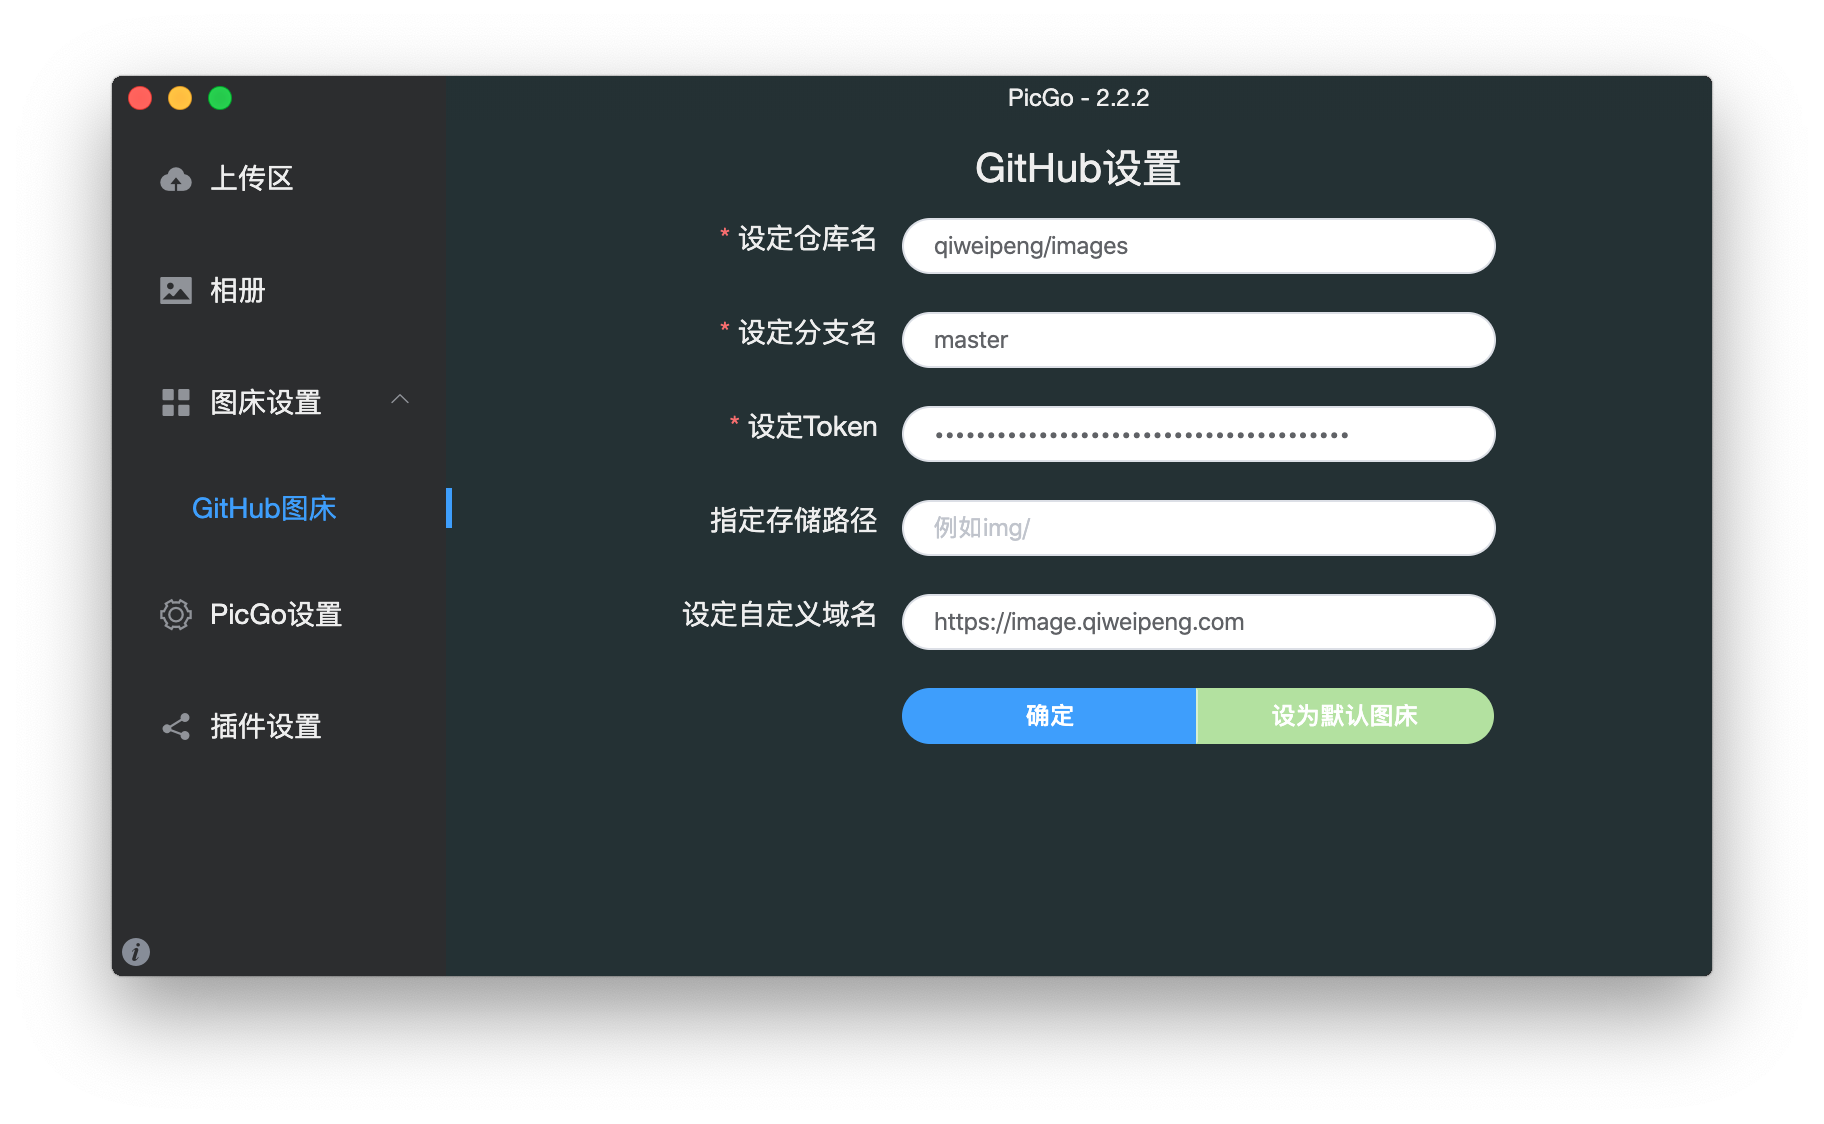
图 - 4: PicGo 中 GitHub 图床设置
其中需要配置 Personal access tokens,命名如 Weipeng's MacBook Pro - PicGo,打开的权限:
- repo
Trojan
User Rules 配置:
1 | ||notion.so |